• Skip to main content
  • Skip to primary sidebar
  • Skip to footer

LA BELLA VITA

The Art of Italian Living

  • Home
  • About Me
  • Recipes
  • Cooking Classes
  • Culinary Tours

August 30, 2016 By Deborah Dal Fovo Leave a Comment

Savoring Summer
Baked Sunset Peaches with Amaretti Filling

Baked Sunset Peach with Amaretti Filling - Yellow peach half is filled with fragrant ground almonds, sugar and fruit pulp then baked until luscious and gloriously golden with ruby red rim.

When I was a little girl, I used to play a secret game at the dinner table. I would identify my favorite food on the plate and save a bit of it off to one side to enjoy last. I wanted the special taste to linger in my mouth—and in my mind—after the meal ended. When dinner was almost over, and I’d patiently finished the rest of the meal, I would close my eyes and savor that last luscious bite of goodness. That’s how I feel about summer. While I never want it to end, there are good reasons to look forward to its final moments. Like peaches and sunsets. They are both worth waiting until the end of summer for.

late-summer-sunset-san-franciscoAs summer passes the halfway mark and rounds the corner towards Fall, sunsets grow more vibrant and intense until the evening sky is a pigment-streaked painting of gold, pink and red brushstrokes. That’s what I saw the first time I pulled my Baked Sunset Peaches with Amaretti Filling from the oven—golden spheres rimmed in ruby red and awash in a bright magenta syrup. They looked like a late summer sunset in all its glorious splendor and I named them appropriately on the spot. And, after taking the first bite, I knew there was even more reason to love them.

There’s something magical about the combination of peaches and almonds. Both have unique aromatic qualities that are complimented when they unite and intensified when they are cooked. Here, rosy-skinned yellow peaches are filled with ground almonds, sugar, and peach pulp then baked until spoon soft and golden. The sweet crackle of the caramelized surface gives way to a pudding-like consistency of deeply flavored cooked peach followed by a delicate, chewy filling that leaves a whisper of almond essence on the palate. But—like the soul-satisfying taste of a late summer sunset—one must wait patiently until the latter half of the season to make this dish when the right kind of peach is ripe.

Baked Sunset Peaches with Amaretti Filling - Yellow peach halves are filled with fragrant ground almonds, sugar and fruit pulp then baked until gloriously golden and glazed with ruby red syrup.

Even though peaches come in hundreds of varieties, they are usually only categorized by color—whether they are yellow or white. But an important distinction between peaches—and one that is essential for this dish—is whether they are clingstone or freestone. Luckily, their names give clues to help understand the difference. Clingstone peaches, that are available in early summer, have flesh that clings to the stone or pit. When the fruit is cut in half, it is very difficult to separate because the flesh stubbornly sticks to the pit. They’re the kind of peach you want to bite into and let the juice drip down your chin, but are not appropriate for cooking because they melt. Contrarily, freestone peaches, that are only available in the latter half of summer, have flesh that separates freely from the stone. They are easy to cut in half and separate with a gentle twist, and the pit comes away effortlessly. Freestone peaches have a compact texture that holds up to heat, making them perfect for baking. Only freestone peaches are appropriate for this dish and worth waiting for until late summer.

Baked Sunset Peaches with Amaretti Filling - Yellow peach halves are filled with fragrant ground almonds, sugar and fruit pulp then baked until luscious and gloriously golden with ruby red rims.

I love cooked fruit desserts and this one is my own personal twist on a classic Italian dish that fills peach halves with crushed Amaretti cookies before baking. But instead of using store-bought cookies, which can result in a dry, artificial tasting center, I make my own amaretti cookie filling of ground almonds and sugar infused with peach pulp for extra flavor. When baked inside the peaches, it becomes a delicate yet chewy center that surprises and delights. Before baking, I christen the peaches with white wine or Marsala, which mingles with the rosy color of their skins and creates a gorgeous magenta-tinted syrup in the pan. My dressed up Baked Sunset Peaches with Amaretti Filling are quick and easy to prepare and serve warm or at room temperature with a soft dollop of lightly whipped cream. The sensual, satisfying taste and texture will make them one of your favorite desserts and worth the wait to savor that last, luscious bite of summer.

Baked Sunset Peaches with Amaretti Filling - Yellow peach halves are filled with fragrant ground almonds, sugar and fruit pulp then baked until luscious and gloriously golden with ruby red rims.

Watch as I make my Baked Sunset Peaches with Amaretti Filling step-by-step in this TV appearance below:

BAKED SUNSET PEACHES WITH AMARETTI FILLING
Pesche Ripiene al Forno

Created by Deborah Dal Fovo on August 30, 2016

Baked Sunset Peaches with Amaretti Filling - Yellow peach halves are filled with fragrant ground almonds, sugar and fruit pulp then baked until luscious and gloriously golden with ruby red rims. 
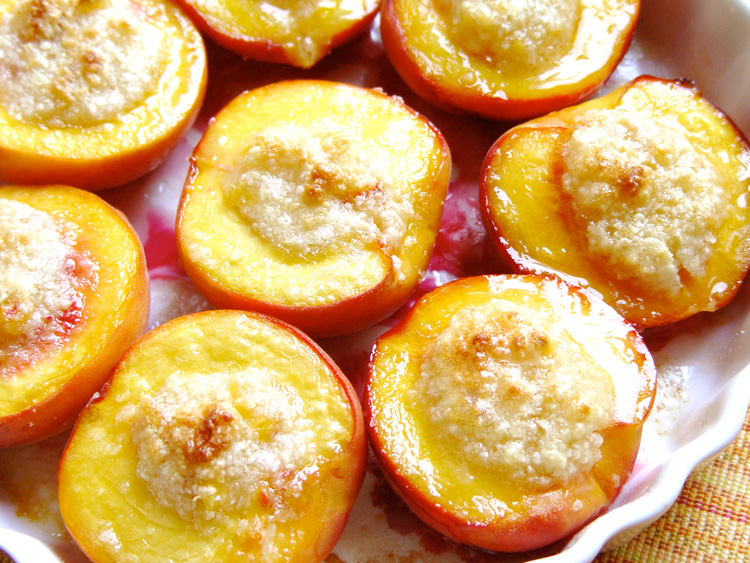
I gave my peaches this name because they look like a beautiful summer sunset in all its glory. Yellow peach halves are filled with ground almonds, sugar and peach pulp then baked until golden with ruby red rims. They’re luscious and worth the wait until late summer when freestone peaches are in season. © 2009 Deborah Dal Fovo. All rights reserved.

  • Prep Time: 10m
  • Cook Time: 30m
  • Serves: 6
  • Category: Recipes

Ingredients

  • 3 ripe yet firm yellow Freestone peaches, without soft spots or blemishes
  • 5 tablespoons/60g sugar
  • 6 tablespoons/38g finely ground blanched, peeled almonds (see note below)
  • 2 tablespoons melted butter/28g, plus more to grease baking dish
  • Dry white wine or Dry Marsala
  • Soft whipped cream to garnish (optional)

Instructions

  1. Preheat the oven to 350°F/180°C. Generously butter a 9-inch baking dish, preferably made of porcelain or glass.
  2. Wash the peaches under cold, running water and pat dry. Divide each peach in half lengthwise by using a sharp knife to cut along the natural crease of the fruit that runs from the stem dimple then continue around its circumference. Separate the peaches halves by gently twisting apart then remove and discard the pits.
  3. Using a melon ball tool or teaspoon, hollow a round 1-inch cavity from the center of each peach half and scoop out the pulp, reserving it for the filling. Arrange the peach halves with cut side up in the baking dish, placing them close together and leaning against one another so they don't tip during baking.
  4. Chop the reserved peach pulp finely and place in a mixing bowl. Add 4 tablespoons of the sugar, ground almonds, 1 tablespoon of the melted butter, and any peach juices that have accumulated on the cutting board, then mix well to combine.
  5. Fill the hollow of each peach with about 1-tablespoon of the almond filling to form a neat mound about the size of a walnut in the center. Lightly christen the peaches with the wine by dipping your fingertips in the liquid and flicking it over the fruit. Evenly sprinkle the surface of each peach with ½-teaspoon sugar, then drizzle with the remaining melted butter.
  6. Place in the center of hot oven and bake for 30 minutes or until the peaches are tender when tested with the point of a paring knife and amaretti filling is lightly golden. Remove from oven and cool for at least 15 minutes before serving warm or at room temperature, plain or garnished with a dollop of lightly sweetened soft whipped cream.
  7. Note: Finely ground almonds are often labeled "almond flour" in the marketplace. You can also make it from scratch by pulsing 1-1/3 ounces/38g blanched, peeled almonds with 1 tablespoon sugar in a food processor until very fine. Use the chopped almonds in recipe without measuring again but reduce the sugar by 1 tablespoon.
Source: Deborah Dal Fovo for La Bella Vita - The Art of Italian Living
  • Print

Share this:

  • Click to share on Twitter (Opens in new window)
  • Click to share on Facebook (Opens in new window)

Related

Filed Under: Desserts - Dolci, Fruit, Recipes

DON’T MISS A POST!

Get posts/recipes by email.

Reader Interactions

Leave a Reply Cancel reply

Your email address will not be published. Required fields are marked *

Recipe Rating


This site uses Akismet to reduce spam. Learn how your comment data is processed.

Footer

Menu:

  • Home
  • About Me
  • Recipes
  • Cooking Classes
  • Culinary Tours

Most recent Instagrams:

This moist and nutty cake is a religious experienc This moist and nutty cake is a religious experience in every bite...in more ways than one!

Tarta de Santiago ~ Spanish Almond Cake

2 cups/250g finely ground blanched almonds or almond flour (see my previous post for recipe)
250g superfine or granulated sugar
6 large eggs, at room temperature
Pinch of salt
Zest of 1 lemon or ½ orange or both
1/4 teaspoon almond extract (optional)
1 tablespoon liqueur (optional)
Confectioners’ sugar for dusting

Butter an 8-inch round cake pan then line the bottom with a parchment round.

Preheat oven to 350F/180C. 

Separate the eggs, placing the whites in the clean, dry bowl of a stand mixer with whisk attachment. Add a pinch of salt and beat at medium speed to stiff (but not dry) peaks. They should stand straight up in a point on the whisk when lifted. Transfer the mounted egg whites to a clean, dry bowl and set aside.

Place the egg yolks in the same mixing bowl used to mount the whites. Beat at medium speed for a minute or two then gradually sprinkle in the sugar, a little at a time, while beating. Add the grated zest, almond extract, and/or liqueur and beat again until pale and creamy. Stir in the ground almonds until well blended. 

Use the whisk by hand to mix a quarter of the mounted egg whites into the mixture to lighten it then use a spatula to carefully fold in another quarter of the whites without deflating them. Repeat with the remaining two quarters of whites until the batter is light and airy.

Pour the batter into the cake pan and bake for 40 minutes without opening the oven door. Remove from oven and cool completely then run a knife around the sides of the pan and invert onto a cake stand or plate. Peel off the parchment paper and discard.

Before serving, sift the top of the cake with powdered sugar. If using a stencil of Santiago (St. James) cross to decorate the cake, place it in the middle of the cake and dust with powdered sugar then remove the stencil to reveal the cross symbol. Cut into slices and serve plain or with fruit preserves and whipped cream.

#baking #cake #almondcake #tartadesantiago #Santiagocake #spanishcuisine #cookingvideo #reels #recipe
Mmmm, wouldn’t you love to taste this luscious b Mmmm, wouldn’t you love to taste this luscious baked peach with amaretti filling? Well, you can by getting my signature recipe on the blog TheArtOfItalianLiving.com and making them for yourself (this one’s mine 😋). You can thank me later cause I know you’re gonna love it 😉. Buon appetito and follow me for more of my Italian recipes and cooking tips. Ciao for now 😘.
☀️ My summer fruit galette (crostata) has got ☀️ My summer fruit galette (crostata) has got to be the sexiest seasonal item on my menus. Only the ripest, juiciest summer fruit goes into a flaky free form crust and the results are, um… #beyoncé says it best “you sexy mother**” 😂

Get my recipe for the pastry dough on my previous post for Almond and Apricot Galette 💛

#italianchef #deborahcooks #cookingwithdeborah #baking #summervibes  #summercooking #sexyfood #crostata #galette #pastry #cookingtips #recipe #cookingvideo #reels #summerrenaissance
CRISPY FRIED ZUCCHINI BLOSSOMS If you’re lucky e CRISPY FRIED ZUCCHINI BLOSSOMS
If you’re lucky enough to find zucchini blossoms, there are many ways to enjoy them: in risotto, pasta, frittata, stuffed. But my favorite way to enjoy these edible summer flowers is to simply batter fry them and let their natural goodness shine. Good batter is key, and I’ve got the secret to the lightest, crunchiest one around. 

First a word about zucchini blossoms, or ‘fiori di zucca’ in Italian. Choose only male flowers with thin stems and not female flowers attached zucchini. Trim stem to 2-3 inches (handles comes in handy for frying/eating). Mornings are best when flowers are open and stamens are visible, but if closed, gently open delicate petals with fingers then reach in and pinch off stamens and any ants hiding inside. Dust with a soft brush or dry paper towel (don’t wash under water!). Zucchini blossoms last for days in the refrigerator, layered between sheets of paper towel in air-tight containers. 

For the batter...mine is simple: equal parts (more or less) water and flour with a pinch of salt. My secret to super smooth batter is to start with cold water (I use sparkling) and sift flour INTO THE WATER…not vice versa. My technique of tapping a strainer filled with flour on whisk as I stir adds a veil of flour with each tap as it’s smoothly incorporated into the water. Look Ma, no lumps! This allows you to add more flour if a thicker batter is needed but without wasting flour if not. 

For the crunchiest coating, I mix 2/3 rice flour and 1/3 all-purpose flour. The consistency should be like pancake batter—thick enough to coat the blossom without being overly heavy. 

Heat 1-inch of frying oil (sunflower, canola, peanut, olive oil) to 365F/185C in a pan large enough to fry the blossoms in batches without crowding. Work quickly to coat blossoms in batter and slip into the hot oil. The oil temp will drop when blossoms are added, so regulate heat and keep oil at 350F/175C. Fry until golden (1-2 minutes per side), turning once. Lift fried blossoms out of pan and transfer to a metal cooling rack/mesh strainer and fry the rest (my secret to crisp coating!). Sprinkle fried blossoms with salt while hot and enjoy immediately.
I make my own ground almond flour for cakes and co I make my own ground almond flour for cakes and cookies because…why buy store-bought when making homemade from raw almonds is fresher, more flavorful, and less expensive? Plus, it’s easy, fun, and the flavor is unbeatable. Freshly homemade ground almond flour is best! 

Here is my step-by-step method:
1. Measure out the amount of raw almonds for the recipe adding 5-10% more to compensate for peels
2. Blanch the almonds in boiling water for 1 minute until skins are wrinkly then drain in a strainer
3. Let almonds cool until manageable (but not dry) then pinch the large end of each almond between thumb and forefingers until it slips it out of its skin. Place the peeled almonds on a baking sheet and compost the skins. Do the same with all the almonds using both hands for quicker work.
4. Place peeled almonds in a 350F/180C oven for 5 to 7 minutes until dry, shaking the baking sheet once or twice.
5. Remove from oven and cool completely. Transfer almonds to the bowl of a food processor and sprinkle with 2 tablespoons of the sugar from the recipe you are preparing (remember that you did this and use less sugar in the final recipe).
6. Process the almonds until finely ground by PULSING the machine on and off. Do not run the machine or the almonds will overheat and become oily. Patience is the key here. Also, make sure to scrape the bottom of the bowl to release packed down almonds. Pulse until desired consistency is achieved. NOTE: homemade ground almond flour will be slightly coarser than ultra fine commercially made. 
7. Measure the ground almond flour needed for your recipe and freeze or refrigerate excess for another use.

👉Stay tuned for an amazing Spanish Almond Cake recipe coming soon using this ground almond flour. You can thank me later 😆

Follow for more cooking tips and let me know what you’d like to learn. 

Love from my kitchen to yours ❤️😘

#italianchef #italiancooking #baking #cookingtips #bakingtips #almondflour #recipe #reels #cookingvideo #cookingtutorial #tutorial #madewithlove
Instagram post 17961164743853172 Instagram post 17961164743853172
Follow on Instagram

Stay Connected:

  • Email
  • Facebook
  • Instagram
  • LinkedIn
  • Pinterest
  • YouTube

© 2016-2020 Deborah Dal Fovo, La Bella Vita - The Art of Italian Living. All rights reserved.


Loading Comments...