• Skip to main content
  • Skip to primary sidebar
  • Skip to footer

LA BELLA VITA

The Art of Italian Living

  • Home
  • About Me
  • Recipes
  • Cooking Classes
  • Culinary Tours

Desserts - Dolci

Apricots in Vanilla Syrup
Albicocche Sciroppate

June 17, 2021 By Deborah Dal Fovo Leave a Comment

Apricots in Vanilla Syrup

Carpe diem! That’s the Latin phrase meaning “seize the day” and it was exactly what I did when I spotted the first apricots of the year at my farmers’ market. While I always prepare jam with summer apricots, this fruit was so small and perfect that I decided to make my Apricots in Vanilla Syrup and capture their whole natural goodness in a jar. Since apricots are the first sweet taste of stone fruit in late spring/early summer but have an all-too-brief season, I make their enjoyment last a little longer by preserving them in simple syrup in shelf-stable jars.

When I saw the sea of beautiful Gold Kist apricots piled on the market stand, I had a delicious déjà vu of my life in Tuscany decades earlier when our fruit trees produced a bumper crop of tiny, sweet apricots like these…all at once! The harvest was so bountiful that we didn’t know where to put them, so every flat surface of my home was covered in blushing little orbs that gave the rooms a warm glow and a magical scent. The delicate apricots ripened quickly and I soon realized that we couldn’t possible eat all the fruit au naturel, so I needed to find ways to cook them presto or they’d spoil. I quickly got to work preparing everything I could think of with apricots—jams, preserves, cakes, tarts, breads…even a lovely liqueur. But perhaps the purest and most natural way I captured the essence of that special summer was by making these albicocche sciroppate, apricots in vanilla syrup, that I jarred for the winter.

Making them is incredibly easy and well worth the little time it takes. First, I halve the apricots, reserving their hard pits to crack open and extract the precious kernels inside—called mandorle amare or bitter almonds—to give the syrup a hint of almond flavor. In fact, bitter almonds are often finely ground and added to Italian baked goods—in particular almond biscotti from Tuscany known as cantucci—to give them a lingering aromatic quintessence that almonds alone can’t provide. Next, I make a simple syrup—an appropriate name for the equal parts sugar and water mixture that, when boiled, become a sweet, silky base in which to preserve the apricots—adding vanilla bean for extra sensual flavor (spices like cardamom seeds or cinnamon stick are lovely too). Then, I pack the apricot halves tightly in sterilized canning jars and pour over the molten syrup before sealing and processing in a hot water bath.

Once cool, I store the jars of jewel-like Apricots in Vanilla Syrup in my pantry to savor during the cold, dark winter months when I crave a ray of summer sunshine and a taste of summer fruit. I spoon the shiny, golden apricots over gelato, on cake, or eat on their own…in a pool of luscious syrup.

I hope that you seize the apricot-moment and preserve some to enjoy all year long. Just follow my recipe and video!


APRICOTS IN VANILLA SYRUP – Albicocche Sciroppate
{recipe}

Makes three 1-cup jars

  • 1 pound/454g ripe yet firm apricots, preferably small and unblemished
  • ½ cup/120g water
  • ½ cup/100g sugar (preferably organic cane sugar
  • 3 two-inch/4cm pieces of vanilla bean, scored
  • 12 apricot kernels (removed from apricot pits)
    Special equipment:
  • 3 half-pint/240ml canning jars with new lids
  • Canning pot with rack or large pot with lid and clean towel; tongs

Note: before beginning recipe, wash and sterilize jars as directed in “Hot water bath canning method” below.

Wash the apricots under cold, running water and pat dry. Divide each apricot in half lengthwise by using a sharp knife to cut along the natural crease of the fruit starting from the stem dimple and continuing around its circumference. Separate apricot halves by gently twisting apart then remove the pits and reserve.

Crack open 12 apricot pits and extract the kernels. To do this, place the pits in a clean cloth or towel and tap with a hammer until the shell cracks. Remove inner kernels (that look like almonds) and discard pit shards. The apricot kernels—called bitter almonds—will add a delicate almond flavor to the syrup.

Prepare a simple syrup by placing water, sugar, and vanilla beans in a small saucepan and bringing to a boil over medium heat. Boil for 1 or 2 minutes until sugar has melted completely and a medium consistency syrup is created. Keep the syrup hot over low heat without boiling further.

Arrange the apricots—cut side down—in warm sterilized jars, fitting their curves snugly against each other. Gently press down to pack as many apricot halves as possible in the jar (without bruising the fruit) to 1/2-inch below rim. Insert 4 apricot kernels in each jar. 

Remove the vanilla beans from syrup and place one in each jar. Pour hot syrup over the apricots to cover, leaving about 1/2-inch headspace below jar rims. Wipe the rims with a clean, damp paper towel to remove any traces of syrup then screw on lids and twist until just fingertip tight. 

Process the jars in boiling water using the water bath canning method (see method below) for 15 to 20 minutes for half-pint jars (10 minutes for 1/2-cup/120ml jars) then store in a cool, dark place for up to one year.

Hot water bath canning method:

1. Wash jars, lids and bands in hot, soapy water and rinse well. Let the lids and bands air dry on clean towel. Sterilize the jars in boiling water for 5 to 10 minutes then drip dry overturned on a clean towel. Alternatively, sterilize jars by placing upright on a baking sheet and heating in a 250°F/121°C oven for 20 minutes before filling. Sterilize jars just before filling and keep hot so they are the same temperature (or close to it) as hot ingredients.

2. Carefully fill hot jars (preferably using a wide-mouth funnel) with hot ingredients leaving 1/2-inch headspace below rim of jar for half-pint jars or larger (for smaller jars leave 1/4-inch headspace below rims). Wipe rims with a clean, damp paper towel and allow to dry briefly. Place new lids and bands on jars, then twist just until fingertip tight, without over tightening. 

3. Use a canning pot with rack or arrange a cotton napkin or kitchen towel in the bottom of a pot large enough to hold jars without touching and tall enough to allow 2 to 3 inches headspace over jars. Carefully place filled jars in pot and cover with hot water by at least 2 inches. Place over high heat and bring water to a boil then adjust heat to steady simmer. Cover pot and boil the jars at a constant simmer for the time specified in recipe or according to instructions for specific size jar, adjusted for altitude if needed.

4. Turn off heat and let jars stand in hot water for 5 minutes then remove using tongs and place on wire rack or kitchen towel to cool undisturbed for 12 hours. When jars are completely cool, check that each lid has sealed properly by pressing down in center. Lid center should remain down if properly vacuum sealed and not pop up or down when pressed. Tighten lid bands if loosened. Store in cool, dry place for up to 1 year.

Filed Under: Desserts - Dolci, Fruit, Uncategorized

PROOF IN THE PUDDING
MAGIC LEMON PUDDING {GLUTEN AND DAIRY FREE RECIPE}

February 15, 2020 By Deborah Dal Fovo 2 Comments

magic lemon pudding on blue plate

Once in a blue moon, I come across a recipe that surprises me. This Magic Lemon Pudding is one of those. When my food writing mentor and friend, Tori Ritchie, posted a genius recipe for Lemon Meringue Pudding on her blog, I was intrigued. She found it in her mother’s recipe box and it was an oldie-but-goodie dessert that her family enjoyed for decades. Not only did the vintage recipe’s name pique my curiosity (after all, who doesn’t love the taste and textures of lemon meringue pie), but the easy, breezy one-bowl batter that magically transforms in the oven into a multi-layer dessert with silky lemon curd layer and spongy cake topping made my mouth water. I had to try it—only there was a slight problem. The recipe called for milk and flour in addition to Meyer lemons, sugar, and eggs. I’ve been avoiding gluten and dairy for health concerns and this recipe was theoretically a no-no. But I’ve always hated the word “no” and was determined to have my pudding and eat it too. So, into kitchen I went to try and adapt the recipe to be both gluten-free and dairy-free.

magic lemon pudding testing

Developing recipes is like playing mad scientist. You add a little of this, less of that, a pinch of something else until—presto, you get it right. The alchemist in me loves to fiddle with recipes because I never know what will happen along the way. That’s exactly how this went. After posting a photo of my first test pudding on Instagram, I got a comment from a woman saying it was her favorite childhood dessert too—only her mother’s English recipe was called Lemon Delicious. Hmmmm, I thought, let me investigate this further. After some research, I found an (almost) identical baked lemon pudding recipe that was popular in Britain and Australia decades ago but also contained butter. The recipe plot just thickened! What at first glance seemed to be an easy adaptation suddenly turned into a whole other pudding—I had just gone down the recipe writing rabbit hole ; )

magic lemon pudding batter

Like the Rolling Stone’s song “I can’t get no satisfaction”, gluten-free recipe adaptations seldom taste or behave like their wheat-containing predecessors. Especially in baking, where the gluten in wheat flour thickens and binds ingredients in a way non-wheat flours don’t. For that reason, a thickening agent like tapioca, potato flour, or cornstarch is added to gluten-free flour. Then there’s the substititution of the milk. I’ve tried many non-dairy plant-based milks like almond, coconut, and cashew but don’t get the same satisfaction (there’s that “s” word again) that cows’ milk gives me—with the happy exception of oat milk. Oat milk’s creamy consistency and neutral flavor makes it more similar to cows’ milk than nut milk, without adding extra flavor. I also chose oat flour to sub in for the wheat flour to keep the taste uniform and because I find it performs well in gluten-free baking.

magic lemon pudding bain-marie

The beauty of this Magic Lemon Pudding is that the batter is quick and easy to whip up in one bowl before pouring into a single baking dish or individual ramekins. That means less clean up (don’t we all love that?). First, I beat my egg whites in a squeaky-clean mixing bowl until light and fluffy then slide them into a smaller bowl while I use the same, unwashed mixing bowl to mix the other ingredients before gently folding the egg whites back in. This gives the batter its airiness, which—when baked in a bain-marie—causes it to rise like a cake and (I suspect) magically separate into layers. Beating the egg yolks with cornstarch and sugar until creamy before adding the zest, lemon juice, oat milk, and oat flour separately insures that each ingredient blends smoothly for a lump-free pudding. It’s worthwhile to use Meyer lemons—a hybrid of citron and mandarin orange—whose golden skin adds beautiful color and sweet juices a delicate lemon flavor without the tartness.

magic lemon pudding close up

After all my testing, the proof was (literally) in the pudding. Just like Goldilocks, I tested—and tasted—each variation of the original recipe. One was too soft, one too stiff, another too lumpy, until finally—one was just right! The batter made with oat milk, oat flour, and cornstarch separated beautifully into a golden lid of spongy soufflé-like cake that, when pierced with a spoon, revealed a luscious lemony pudding beneath—just like the original recipe. I’m not sure how it happens but it’s so magical that I’m calling my gluten-free and dairy-free recipe: Magic Lemon Pudding. If you’re a lemon lover like me, this recipe will become a favorite of yours too!


GLUTEN-FREE & DAIRY FREE
MAGIC LEMON PUDDING

Created by Deborah Dal Fovo on February 7, 2020

magic pudding on blue plate 2 I renamed this recipe Magic Lemon Pudding because the easy breezy, one-bowl batter magically transforms in the oven into a multi-layer dessert with silky lemon curd layer and souffle-like cake topping. My gluten-free and dairy-free recipe is adapted from Tori Ritchie’s Tuesday Recipe for Lemon Meringue Pudding. ©2020 Deborah Dal Fovo. All rights reserved.

  • Prep Time: 15m
  • Cook Time: 40m
  • Serves: 6
  • Category: Baked Goods, Baking, Dairy Free, Desserts - Dolci, Gluten Free, Recipes

Ingredients

  • Unsalted butter, for greasing baking dish/es
  • 3 large eggs, at room temperature
  • Pinch of salt
  • 1 tablespoon cornstarch
  • 3/4 cup/150 g granulated white or cane sugar
  • Grated zest of 1 Meyer lemon (regular lemon can be substituted)
  • 1/3 cup/80 ml Meyer or regular lemon juice
  • 1 cup/240 ml gluten-free oat milk, at room temperature
  • 1/4 cup/25 g gluten-free oat flour
  • Powdered sugar to garnish (optional)

Instructions

  1. Preheat oven to 350°F/180°C. Bring a kettle of water to boil.
  2. Grease an 8-inch glass baking dish (or six 1-cup ramekins) with butter. Select a larger baking dish or roasting pan that the baking dish/ramekins will comfortably fit into with space around to create a bain-marie.
  3. Separate the eggs and place egg whites and a pinch of salt into the clean, dry bowl of a stand mixer with whisk attachment. Beat egg whites on medium speed until thick and frothy then increase speed and beat until they hold stiff (but not dry) peaks. Using a spatula, scrape the mounted egg whites into a separate bowl and set aside.
  4. Place the egg yolks and cornstarch in the mixer bowl (without washing it or the whisk attachment) and beat briefly until smooth. With the machine running, add the sugar in increments and beat until mixture is pale and creamy.
  5. Add the zest and lemon juice and mix to combine then pour in the oat milk and mix well.
  6. Add the oat flour and beat briefly until smoothly incorporated without overworking.
  7. Using a rubber spatula, gently fold one-third of the egg whites into the lemon batter. Add another third of the egg whites, incorporating well without deflating batter, then fold in remaining whites until batter is smooth and airy.
  8. Pour batter into greased baking dish/es and place in the larger pan. Position pan in the center of oven rack and carefully pour boiling water from the kettle into outer pan until it comes about halfway up the sides of inner dish/es. Bake until golden brown on top, 35 to 40 minutes. Let cool slightly, then spoon the pudding into dessert bowls, dust with powdered sugar, and serve warm.
Source: Deborah Dal Fovo
  • Print

Filed Under: Baking, Dairy Free, Desserts - Dolci, Gluten Free, Recipes

Patience and persimmons
Persimmon and Pecan Bread

January 27, 2017 By Deborah Dal Fovo Leave a Comment

Persimmon and Pecan Bread - Hachiya persimmon pulp is the star ingredient in this irresistibly fragrant fruit and nut bread.

It’s often said that patience is a virtue and good things come to those who wait. This is especially true when it comes to Hachiya persimmons, an obscure and misunderstood winter fruit known as kaki to the Japanese and cachi to Italians. These persimmons are often confused with the flatter Fuyu variety that is eaten firm like an apple early in the season. But Hachiya persimmons—whose inviting shiny orange, pointed forms make them tempting to enjoy when they are young—must mature and soften for weeks on end before they are edible. It makes January the perfect month to make this Persimmon and Pecan Bread when fruit that has been slowly ripening on the window sill is very soft and ready for use. Hachiya persimmon’s delicate sweetness and alluring fragrance give this simple bread an air of aristocracy that makes it ideal for afternoon tea or a luxurious breakfast in bed…and well worth waiting for.

Persimmon and Pecan Bread - Hachiya persimmons in a wooden bowl create a colorful decorative display while they ripen to perfect softness.

A seasonal fruit with oriental origins, Hachiya persimmons first appear on leafy trees in late autumn. But their beauty is not fully evident until winter when the tree sheds its leaves to reveal bare branches hung with brightly colored, heart-shaped fruit—making it look like a timely Charlie Brown Christmas tree strung with shiny ornaments. The fruit is firm and immature at this point and must ripen further to allow harsh tannins to mellow and sweetness to develop. Take them home and place on your counter or window sill and watch the change that occurs as they mature. I fill an antique wooden bowl with vibrant orange persimmons and use as a cheerful decorative item in my home while they ripen.

Persimmon and Pecan Bread - Hachiya persimmons in a row at diverse stages of ripening.

As they ripen, persimmons slowly soften and become darker in color until finally—after two to four weeks—they are mature enough to eat or cook with. You can see the change happening in stages as they go from hard, yellow-orange pointed fruit to red-orange slouchy orbs with loose, wrinkled skin. At the perfect point of ripeness, they look like water balloons—heavy, jiggly and ready to burst. Don’t be tempted to eat them before this time or you’ll experience a very unpleasant astringent aftertaste in your mouth. To speed up the ripening process, some people freeze partially ripe persimmons for 24 hours then thaw before cooking. In a pinch, this can help soften the fruit and reduce tannins, but they won’t be as sweet or mellow as naturally ripened persimmons. Be patient with persimmons and you will be rewarded!

persimmon-on-spoon

Food memories are precious things and I still recall the first time I tasted a persimmon. It was at Torre di Pisa restaurant in Milan, where I was dining with my then-boyfriend in the dead of winter. “I took the liberty of ordering you dessert since they have a very special fruit that is only available for a very short time”, said Maurizio as the waiter slid a plate in front of me. Expecting to see colorful tropical fruit, I looked down to find a wrinkly, burnt-orange blob on my plate that looked less than appealing. Slightly puzzled I asked, “What do I do with it?” Maurizio laughed, “Make a cross cut in the center and open it like a flower, then eat the inside with a spoon…like pudding.” I followed instructions and slid my knife through the paper-thin skin then repeated the motion crosswise. The persimmon fell open like four petals in a sensual display of glistening, jelly-like pulp that beckoned a taste. I dipped my spoon in and scooped some out. It was shiny and syrupy—more like soft jelly than raw fruit—and very much what in Italy we call dolci da cucchiaio or spoon desserts like creme caramel and panna cotta. When I lifted the spoon to my mouth, a delicate floral scent filled my senses like fine perfume. The taste in my mouth was…well, luscious. Silky and sweet with a hypnotic exotic fruit flavor and lingering vanilla finish. I was mesmerized and fell in love immediately (with the persimmon, not with Maurizio).

inside-persimmon

Over the years, I continued my love affair with persimmons and searched them out each winter at my neighborhood fruttivendoli in Milan. But it was only after moving to California—and once I was teaching Italian cooking and developing my own recipes—that I became intrigued with the idea of a persimmon bread. I began experimenting to get the right balance of sweetness, wet to dry ingredients, and leavening to make a moist yet light fruit bread that showcased persimmon’s delicate flavor and fragrance. The decision to add pecans, with their subtle buttery nuttiness, was the natural choice to quietly complement persimmon’s ethereal qualities without overpowering them.

Persimmon and Pecan Bread - Bright hachiya persimmon pulp is strained smooth through a sieve before adding to sweet bread batter.

The batter for Persimmon and Pecan Bread is simple and easy to prepare. Cut open ripe persimmons and scoop out the pudding-like pulp then strain it through a sieve so it’s silky smooth and free of unwanted seeds or fibers. Measure out the amount that you need for the recipe but don’t waste any leftover puree! Persimmon puree freezes well and keeps for up to 6 months. Just thaw and use like fresh to make persimmon and pecan bread well into the spring.

Persimmon and Pecan Bread - Colorful and fragrant hachiya persimmon pulp adds an exotic note to this sweet bread batter.

The secret to a light, airy bread is to mix the dry ingredients together first then add them to the wet ingredients with a few quick folding motions until just combined. Don’t overwork the batter or the baked bread will be heavy and rubbery. Then, stir in the toasted pecans and pour the thick batter into a loaf pan. Bake until you can smell a sweet, flowery fragrance wafting out of your oven and the bread is golden orangey-brown on top and set in the center.

Persimmon and Pecan Bread - Hachiya persimmons add beautiful color, fragrance and flavor to this sweet bread batter.

Persimmon and Pecan Bread - Hachiya persimmons add beautiful color, fragrance and flavor to this sweet bread batter. Some things are well worth waiting for and perfectly ripened Hachiya persimmons are one of those. Now, I look forward to winter just to patiently watch these gorgeous persimmons ripen to perfection so I can enjoy this Persimmon and Pecan Bread. I hope you will too!

Persimmon and Pecan Bread - Hachiya persimmon pulp is the star ingredient in this irresistibly fragrant fruit and nut bread.

PERSIMMON AND PECAN BREAD
Plumcake di Cachi

Created by Deborah Dal Fovo on January 19, 2017

Persimmon and Pecan Bread - Hachiya persimmon pulp is the star ingredient in this irresistibly fragrant fruit and nut bread. This persimmon and pecan bread has a delicate, exotic sweetness and fragrance that is a pure joy during grey winter months. Use Hachiya persimmons that are fully ripened and super soft like squishy water balloons to ensure that the pulp inside is sweet and astringent tannins have mellowed.  © 2017 Deborah Dal Fovo. All rights reserved.

  • Prep Time: 30m
  • Cook Time: 55m
  • Yield: Makes one 9-inch/23cm loaf
  • Category: Breads, Desserts - Dolci, Fruit Desserts, Recipes

Ingredients

  • 1 cup/100g raw pecans
  • 1 pound/454g very soft, ripe Hachiya persimmons (about 2 or 3), or 1 cup of strained pulp
  • 2 cups/240g unbleached all-purpose flour
  • ¾ cup/150g granulated sugar
  • 1 tablespoon baking powder
  • ¼ teaspoon baking soda
  • ¼ teaspoon kosher salt
  • 1/8 teaspoon ground cinnamon
  • ½ cup/113g unsalted butter, melted and cooled to room temperature
  • 2 large eggs, at room temperature
  • 1/2 teaspoon pure vanilla extract

Instructions

  1. Preheat oven to 325°F/165°C and place oven rack in the middle position. Butter and flour the inside of a 9-inch/23cm loaf pan.
  2. Spread the pecans in a single layer on a baking sheet and place in hot oven for 5 to 7 minutes or until lightly toasted. Remove from oven and cool completely then run a knife through the nuts once or twice to chop coarsely.
  3. Place the persimmons stem side down on a cutting board and make a cross cut in the center of each down to the stem. Open the fruit like a flower and scoop out the pulp with a spoon, scraping it off the skin and eliminating any black seeds and white fibers. Transfer the persimmon pulp to a mesh sieve set over a bowl then press it through the sieve with the back of a spoon. Scrape bottom of the sieve to capture all strained pulp and measure to obtain about 1 cup. Alternately, you can puree the pulp until smooth in a food processor. Excess persimmon puree can be frozen for future use.
  4. In a medium bowl whisk together flour, sugar, baking powder, baking soda, salt, and cinnamon.
  5. Place the melted butter, eggs and vanilla in a large mixing bowl and beat with an electric mixer until creamy. Add the persimmon pulp and mix until well combined.
  6. Using a spatula, fold the dry ingredients into wet ingredients until just combined and batter is smooth. Do not over mix the batter or the bread will have a rubbery consistency. Add the pecans and fold in until well distributed.
  7. Pour batter into the prepared pan then bake until golden brown and a toothpick inserted in the center comes out clean, about 55 to 60 minutes. If the bread browns too quickly before the inside is cooked, place an aluminum foil sheet over top to prevent burning.
  8. Remove from oven and place on a wire rack to cool for 10 minutes then remove bread from pan and cool. Serve bread warm or at room temperature cut into thin or thick slices.
  9. Note: Persimmon bread can be stored, tightly wrapped. at room temperature for about a week and freezes well.
Source: Chef Deborah Dal Fovo
  • Print


Filed Under: Breads, Desserts - Dolci, Fruit, Recipes, Uncategorized

Sweet Italian Christmas:
Panettone Filled with Whipped Cream, Chocolate and Hazelnuts

December 20, 2016 By Deborah Dal Fovo 4 Comments

Panettone filled with Whipped Cream, Chocolate and Hazelnuts - This easy recipe transforms classic Italian panettone into a festive, showstopping holiday dessert for elegant Christmas and New Years celebrations.

Most Italians would agree with me when I say that it wouldn’t be Christmas without Panettone. This golden dome-shaped sweet bread studded with raisins, candied orange peel and citron, that traditionally makes its appearance for Christmas and New Year, is a must to celebrate the holidays in Italy. You see them everywhere from artisan bakery windows to specialty stores and supermarkets, wrapped in colorful, decorative boxes that make them look like Christmas gifts perfect to bestow on family and friends for the holidays. In Italy, we often find ourselves with too many panettoni and don’t quite know what to do with them. I created this recipe for Panettone filled with Whipped Cream, Chocolate and Hazelnuts as a way to dress up the cake-like bread and make it even more festive. Wrapped with a shiny ribbon and sliced at the table to reveal the surprise filling inside, it makes an elegant and joyous dessert for holiday dinners.

two-panettone-2

Panettone is a sweet, yeasted bread whose elaboration is considered a true accomplishment in the pastry world. Its rich, buttery dough somehow defies gravity as it rises three times in thirty-plus hours to form a light and airy texture scented by the sweet raisins and candied citrus fruits that dot its ethereal crumb. Baked in a decorative paper mold until deep burnished brown then hung upside down to maintain its distinctive rounded dome shape and impressive height, panettone is a holiday ritual and symbol of celebration in Italy. Invented in 15th century Milan, its legend has a few different versions and all of them reflect the labor of love that panettone is to prepare. The classic version containing raisins, candied orange peel, and citron is the original Panettone Milanese, and an obligatory slice is enjoyed as is or embellished with a dollop of mascarpone cream, crema di mascarpone, as a traditional holiday dessert or snack. While there are many commercial brands available, the best panettoni are made by the specialty bakeries of Milan. Since I’m not in Milan this Christmas, I enlisted the help of my Italian baker friend Gary Rulli for this post. Gary kindly offered me the authentic artisan panettoni Milanesi he makes at his Italian caffe’ and bakery, Emporio Rulli in Larkspur, California to use for my dessert.

Panettone filled with Whipped Cream, Chocolate and Hazelnuts - The first step is to hollow out the panettone and sprinkle the bread crumb with Grand Marnier.

While this dessert is seemingly complex, it actually takes very little time and effort since the panettone is store bought. And that’s a very good thing during the holidays when time is precious. The first step to making it is to slice the dome top off the panettone and hollow out the cylindrical bread loaf to make room for the filling. I cut a circular shape in the panettone, leaving a sturdy bread border around the edges and along the bottom, then pull out the center crumb with my fingers to create the empty cavity where the filling will go. To add even more lovely citrus flavor to the dessert, I sprinkle the extracted crumb with Grand Marnier orange liqueur and let it soak in while the other ingredients for the filling are prepared.

Panettone filled with Whipped Cream, Chocolate and Hazelnuts - Shaved dark chocolate and toasted hazelnuts fill this holiday bread.

First, I toast hazelnuts in the oven and tuck them into a kitchen towel to steam before rubbing vigorously in the cloth to remove bitter skins before chopping. Then, I shave a dark chocolate bar (70% cacao preferred) into shards using the blade of my chef’s knife. Here, I also chopped some homemade candied orange peel into tiny dice to add more citrus flavor. Lastly, heavy cream is lightly sweetened with confectioners sugar and whipped until thick and billowy before the chopped ingredients and liqueur baptized panettone pieces are carefully folded in.

Panettone filled with Whipped Cream, Chocolate and Hazelnuts - The panettone bread pieces, shaved chocolate and chopped hazelnuts are folded into sweetened whipped cream for the filling.

The filling is spooned into the empty hollow of the panettone and its dome bread lid placed on top before it goes into the refrigerator to set for a couple of hours. And that’s it! Dessert is made with plenty of time to spare for last minute shopping or gift wrapping. Before serving the panettone, I dust the top with a generous snowfall of powdered sugar and garnish with extra chocolate curls shaved from the bar. Then I tie a beautiful gold ribbon around the bread and serve it on a gilt platter.

Panettone filled with Whipped Cream, Chocolate and Hazelnuts - This easy recipe transforms classic Italian panettone into a festive, showstopping holiday dessert for elegant Christmas and New Years celebrations.

Panettone filled with Whipped Cream, Chocolate and Hazelnuts - This easy recipe transforms classic Italian panettone into a festive, showstopping holiday dessert for elegant Christmas and New Years celebrations.

At the table (once the oohs and aahs have subsided), I remove the ribbon and cut the panettone into wedge-shaped slices, complete with decorative paper border, and serve it with glasses of chilled Moscato d’Asti. My Panettone filled with Whipped Cream, Chocolate and Hazelnuts is a festive, delicious and, above all, easy to prepare dessert that makes holiday entertaining effortless and enjoyable. Buon Natale e Felice Anno Nuovo a tutti! Merry Christmas and Happy New Year to all!

Panettone Filled with Whipped Cream, Chocolate and Hazelnuts: A peek inside this festive Italian Christmas bread filled with whipped cream, chocolate and nuts. A sweet surprise!

PANETTONE FILLED WITH WHIPPED CREAM, CHOCOLATE & HAZELNUTS
Panettone Farcito

Created by Deborah Dal Fovo on December 20, 2016

Panettone Filled with Cream, Chocolate and Nuts: A peek inside this festive Italian Christmas bread filled with whipped cream, chocolate and nuts. A sweet surprise! Traditional Italian Christmas sweet bread is made even more festive with a filling of whipped cream, chocolate shavings, chopped hazelnuts and candied orange peel. © 2016 Deborah Dal Fovo. All rights reserved.

  • Prep Time: 40m
  • Serves: 12
  • Category: Desserts - Dolci, Recipes

Ingredients

  • Panettone Milanese weighing 2¼ pounds/1 kilo
  • 2 cups /500ml heavy whipping cream, cold
  • 4 tablespoons /25g confectioners sugar, plus more to garnish
  • 2 to 3 tablespoons Grand Marnier (rum or cognac can be substituted)
  • 1 3/4 ounces /50g dark chocolate, shaved or chopped into small pieces, plus more to garnish
  • ½ cup hazelnuts (almonds can be substituted)
  • 1/4 cup candied orange peel, cut into small dice (optional)

Instructions

  1. Preheat oven to 350°F/180C°. Spread the hazelnuts on a baking sheet and place in center of hot oven for 5 to 7 minutes, shaking the pan occasionally. Remove from oven then place the hot nuts in the center of a clean kitchen towel. Gather the edges of the towel together to form a pouch then let the nuts steam and cool for 5 minutes. Pick up the pouch by the gathered towel ends and rub the hazelnuts against each other in the towel with your other hand to remove papery skins. Chop the nuts roughly and set aside. (If using almonds just toast and chop without removing skins).
  2. Cut the rounded dome top off the panettone in one clean horizontal slice about 1-1/4 inches in thickness, and set aside.
  3. Using a long, thin knife held vertically, cut out the center of the panettone leaving a 1-inch border around sides and a 1½ inches on the bottom, without perforating the bottom or sides of the bread. Hollow out the bread crumb from the center of the panettone then tear it into pieces and place in a bowl. Sprinkle the panettone crumb pieces with Grand Marnier and toss to coat.
  4. Using an electric mixer, whip the cream until thickened. Add the confectioners sugar and beat for another minute until light and fluffy but not dry.
  5. Fold the torn panettone pieces, chocolate, hazelnuts, and candied orange peel (if using) into the whipped cream. Fill the hollow of the panettone with the whipped cream mixture, pressing down slightly. Replace the bread dome top on the panettone and refrigerate for 2 to 3 hours.
  6. Before serving, dust the top of the panettone with powdered sugar and decorate with chocolate shavings. Place on a round platter and wrap with a festive ribbon if desired. Serve cut into wedges using a serrated knife, taking care to cut through the paper wrapped base cleanly so each slice has a decorative border.
  7. Serve on individual dessert plates accompanied by a glass of moscato d'Asti or other dessert wine or liqueur.
Source: Deborah Dal Fovo
  • Print

Filed Under: Desserts - Dolci, Recipes, Uncategorized

Tuscany in California: Schiacciata con l’uva
Tuscan Grape Focaccia

November 5, 2016 By Deborah Dal Fovo Leave a Comment

Tuscan Grape Focaccia - Schiacciata con l'uva: A sweet wine harvest flatbread from Tuscany made with layers of bread dough filled and topped with wine harvest grapes and sugar. When baked, the grapes and sugar meld together to create a jammy center. Simply deliziosa!

When I lived in Tuscany, autumn’s arrival each year was heralded by a sudden flurry of activity in the countryside. The spell of summer’s lazy lull was broken by a revived energy as locals awakened from their sleepy trance eager to return to normal routine. One of the first signs of this risveglio was the annual wine harvest called la vendemmia. As if beckoned by the waving of a flag at the starting line, workers suddenly appeared in the lush yet rarely visited vineyards carpeting the hillside below my home to pick perfectly ripened clusters of grapes hanging on row after row of endless vines. There was palpable excitement in the air since it meant that those grapes would soon become our cherished local wine. This joyous time of vendemmia is welcomed each year in Tuscany like a sacred ritual with celebrations and symbolic dishes made only during the grape harvest. The most beloved is Schiacciata con l’uva, a Tuscan grape focaccia whose annual presence in bakery windows signals the jubilant start to a month long harvest season. The word “schiacciata” (pronounced ski-ah-chah-tah) means pressed or flattened and is the Tuscan name for savory flatbread otherwise known as focaccia in other parts of Italy. This sweet version, made of bread dough filled inside and out with sugar and juicy grapes that dot its golden surface like precious jewels, is a special treat to look forward to every year as much as the harvest itself.

Italian Chef Deborah Dal Fovo does some grape stomping at Amador County wine crush in California.

This year, instead of Tuscany, I celebrated the wine harvest in Northern California. Like Italy, California is blessed with many wonderful wine producing areas and luscious grapes are in abundance. I take full advantage of these grapes to honor tradition by making this Tuscan grape focaccia and teaching it to my cooking students each year. Last month, I was invited to the “wine crush” in beautiful Amador County where my friend Paul has family owned vineyards that grow many different grape varietals to produce their excellent Sobon wines. There were wines to taste and bins of freshly picked grapes to admire. I even got to do some grape stomping and channel my inner Lucille Ball! But the best part of the weekend was receiving a bag full of grapes to use for my annual Tuscan grape focaccia.

Wine grapes from Amador County California

It felt like Christmas as I opened the bag and pulled out gorgeous bunches of grapes: tightly packed clusters of blue-black Petit Sirah, dangly Cabernet Sauvignon the color of Paul Newman’s eyes, huge purple Black Muscat and delicate, fragrant Orange Muscat. There were even some little clusters of raisins—grapes that had been naturally dried by the sun—to snack on while I reveled in my fortune. You see, using good grapes is important for this bread and in Tuscany those are rigorously freshly picked red wine grapes—with their seeds—to give this bread its intense berry flavor and distinctive crunchy texture. While schiacciata con l’uva was traditionally made with uva canaiola, a grape previously used in Chianti wine, it’s now being replaced with sweet uva fragola or strawberry grapes, known as Concord in the U.S. For my sweet focaccia, I chose the Petit Sirah grapes from my stash that were so small and round they looked like blueberries.

Tuscan Grape Focaccia (Schiacciata con l'uva) - A simple sweet made with flattened bread dough infused with rosemary scented olive oil and filled with wine or concord grapes and sugar.

Tuscan grape focaccia is a rustic snack traditionally made during wine harvest for farmer feasts called sagre contadine and the simplicity of its ingredients bear witness to modest origins: bread dough, olive oil, sugar and red wine grapes (uva nera). The yeasted bread dough recipe used for savory focaccia is enhanced with sugar and rosemary infused olive oil then let rise for an hour or so. It can be made the night before and refrigerated, which also improves the flavor and texture. Once the bread dough is ready, assembly is easy. The dough is divided and flattened or “schiacciata” (hence the name) into a baking pan like a pizza base, scattered with grapes and sugar then covered by another layer of dough and sealed around the edges.

Tuscan Grape Focaccia (Schiacciata con l'uva) - A simple sweet made with two layers of flattened bread dough infused with rosemary scented olive oil then filled and topped with wine or concord grapes and sugar and drizzled with olive oil and honey. Simply deliziosa!

A second smattering of grapes and generous sprinkling of sugar covers the top layer of dough, then it’s drizzled with melted honey and olive oil and let proof while the oven heats. During proofing, the dough rises again, puffing up slightly so the grapes can be poked into the soft surface and create the dimpled effect so emblematic of focaccia. Then into a hot oven it goes where the bread crisps on the outside and the grapes and sugar melt into a jammy center on the inside that fills the focaccia with intense sweetness and flavor.

Tuscan Grape Focaccia - Schiacciata con l'uva: A sweet wine harvest flatbread from Tuscany made with layers of bread dough filled and topped with wine harvest grapes and sugar. When baked, the grapes and sugar meld together to create a jammy center with crunchy seeds. Simply deliziosa!

The result is a glorious flatbread crowned with soft, shiny grapes that adorn its golden surface like precious jewels. Once cool, (the sugary fruit center is molten!) the focaccia is cut into wedges or squares that show off its gooey filling and served as an afternoon snack or dessert. When biting into a slice, the crisp crust gives way to a chewy bread crumb laced with fruit preserves and punctuated by the surprise of grape seeds that give this bread its distinctive crunch. Tuscan grape focaccia epitomizes the simple pleasures in life and celebrates wine harvest in a uniquely delicious way. So, even if you didn’t go to Tuscany for the vendemmia, find some concord grapes at your local market and enjoy this special treat!

Tuscan Grape Focaccia - Schiacciata con l'uva: A sweet wine harvest flatbread from Tuscany made with layers of bread dough filled and topped with wine harvest grapes and sugar. When baked, the grapes and sugar meld together to create a jammy center with crunchy seeds. Simply deliziosa!

TUSCAN GRAPE FOCACCIA
Schiacciata con l’uva

Created by Deborah Dal Fovo on November 4, 2016

Grape Focaccia - Schiacciata con l'uva: A sweet wine harvest flatbread from Tuscany made with layers of bread dough filled and topped with wine harvest grapes and sugar. When baked, the grapes and sugar meld together to create a jammy center with crunchy seeds. Simply deliziosa! Schiacciata con l’uva is a sweet focaccia filled with grapes whose anual appearance in bakery windows signals the joyous start to Tuscany’s autumn wine harvest. It’s a simple treat made from layers of bread dough stuffed and topped with juicy wine grapes and sugar that, when baked, become a jammy filling with the surprise crunch of grape seeds.   © 2016 Deborah Dal Fovo. All rights reserved.

  • Prep Time: 2h 30m
  • Cook Time: 30m
  • Total Time: 3h
  • Yield: Two 12-inch rounds or one 13 x 18 sheet pan
  • Category: Breads, Fruit, Fruit Desserts, Recipes

Ingredients

Bread dough:

  • ¼ cup extra virgin olive oil
  • 2 sprigs of fresh rosemary
  • 1½ cups/355ml warm water (100°F/40°C)
  • 1/4 ounce/7g packet dry active yeast (2 1/4 teaspoons)
  • 1 tablespoon honey
  • 1 pound/454g unbleached, all-purpose or 00 flour (about 4½ cups), plus more for board
  • 4 tablespoons/56g granulated sugar
  • 1 teaspoon kosher or sea salt

Filling and topping:

  • 2 pounds/1 kilo Concord or red wine grapes (with seeds), stemmed, washed and dried
  • ¾ cup/170g granulated sugar
  • 2 tablespoons honey, melted
  • Extra virgin olive oil to drizzle

Instructions

  1. Line two 12-inch round baking pans or one 13 x 18 sheet pan with parchment paper or grease well with olive oil.
  2. Heat the olive oil and rosemary until just warm. Cool to room temperature then remove and discard rosemary. In a small bowl dissolve the yeast and honey in ½ cup of the warm water. Let stand until foamy on surface, 5 to 10 minutes. If mixture does not foam, discard and begin again with fresh yeast.
  3. Sift together flour, sugar and salt in a large bowl or mound on a work surface. Form a well in the center of flour and pour in the yeast mixture, rosemary infused olive oil and 1 cup warm water. Stir with a wooden spoon until ingredients are incorporated and a dough forms. Turn dough onto a floured work surface and knead by hand for 10 minutes until soft, smooth and elastic or in a stand mixer fitted with dough hook for 6 minutes until dough winds up the hook like a cord, adding more flour if too sticky.
  4. Form the dough into a ball and place in a large bowl that has been rubbed with 1 tablespoon olive oil, turning once to coat both sides with oil. Place a damp kitchen towel or plastic wrap over the bowl and set aside in a warm, draft free place to rise until dough doubles in volume, 1 to 2 hours. Dough can be made the night before and refrigerated then brought to room temperature before stretching.
  5. Punch down the dough then turn onto a floured work surface and divide into 2 balls, one slightly larger than the other. Divide the larger ball in half equally then, using floured hands, flatten and stretch each piece into two 12-inch circles about 1/4-inch thick (or stretch the entire ball into a rectangle to fit the sheet pan). You can also use a rolling pin to roll out the dough. Line bottom of baking pans evenly with the stretched dough then distribute 2/3 of the grapes over top in one layer, leaving a 1-inch border around edges. Sprinkle the grapes evenly with a little more than half of the sugar and drizzle lightly with olive oil.
  6. Stretch the remaining dough in the same manner and place over the grapes to form a top layer. Seal the edges well by pinching together then gently press down on the top layer with your hands to crush some of the underlying grapes. Scatter the remaining grapes over top, poking them lightly into dough. Sprinkle with the rest of the sugar then drizzle with melted honey and olive oil. Set aside to proof for 30 minutes before baking.
  7. Preheat oven to 375°F/190°C. Bake in the center of hot oven for 30-35 minutes until golden and fragrant. Cool completely before serving cut into wedges or squares. Best eaten the same day but can be refrigerated and warmed the next day. Freezes well.
Source: Deborah Dal Fovo
  • Print


Filed Under: Breads, Desserts - Dolci, Recipes, Uncategorized

Savoring Summer
Baked Sunset Peaches with Amaretti Filling

August 30, 2016 By Deborah Dal Fovo Leave a Comment

Baked Sunset Peach with Amaretti Filling - Yellow peach half is filled with fragrant ground almonds, sugar and fruit pulp then baked until luscious and gloriously golden with ruby red rim.

When I was a little girl, I used to play a secret game at the dinner table. I would identify my favorite food on the plate and save a bit of it off to one side to enjoy last. I wanted the special taste to linger in my mouth—and in my mind—after the meal ended. When dinner was almost over, and I’d patiently finished the rest of the meal, I would close my eyes and savor that last luscious bite of goodness. That’s how I feel about summer. While I never want it to end, there are good reasons to look forward to its final moments. Like peaches and sunsets. They are both worth waiting until the end of summer for.

late-summer-sunset-san-franciscoAs summer passes the halfway mark and rounds the corner towards Fall, sunsets grow more vibrant and intense until the evening sky is a pigment-streaked painting of gold, pink and red brushstrokes. That’s what I saw the first time I pulled my Baked Sunset Peaches with Amaretti Filling from the oven—golden spheres rimmed in ruby red and awash in a bright magenta syrup. They looked like a late summer sunset in all its glorious splendor and I named them appropriately on the spot. And, after taking the first bite, I knew there was even more reason to love them.

There’s something magical about the combination of peaches and almonds. Both have unique aromatic qualities that are complimented when they unite and intensified when they are cooked. Here, rosy-skinned yellow peaches are filled with ground almonds, sugar, and peach pulp then baked until spoon soft and golden. The sweet crackle of the caramelized surface gives way to a pudding-like consistency of deeply flavored cooked peach followed by a delicate, chewy filling that leaves a whisper of almond essence on the palate. But—like the soul-satisfying taste of a late summer sunset—one must wait patiently until the latter half of the season to make this dish when the right kind of peach is ripe.

Baked Sunset Peaches with Amaretti Filling - Yellow peach halves are filled with fragrant ground almonds, sugar and fruit pulp then baked until gloriously golden and glazed with ruby red syrup.

Even though peaches come in hundreds of varieties, they are usually only categorized by color—whether they are yellow or white. But an important distinction between peaches—and one that is essential for this dish—is whether they are clingstone or freestone. Luckily, their names give clues to help understand the difference. Clingstone peaches, that are available in early summer, have flesh that clings to the stone or pit. When the fruit is cut in half, it is very difficult to separate because the flesh stubbornly sticks to the pit. They’re the kind of peach you want to bite into and let the juice drip down your chin, but are not appropriate for cooking because they melt. Contrarily, freestone peaches, that are only available in the latter half of summer, have flesh that separates freely from the stone. They are easy to cut in half and separate with a gentle twist, and the pit comes away effortlessly. Freestone peaches have a compact texture that holds up to heat, making them perfect for baking. Only freestone peaches are appropriate for this dish and worth waiting for until late summer.

Baked Sunset Peaches with Amaretti Filling - Yellow peach halves are filled with fragrant ground almonds, sugar and fruit pulp then baked until luscious and gloriously golden with ruby red rims.

I love cooked fruit desserts and this one is my own personal twist on a classic Italian dish that fills peach halves with crushed Amaretti cookies before baking. But instead of using store-bought cookies, which can result in a dry, artificial tasting center, I make my own amaretti cookie filling of ground almonds and sugar infused with peach pulp for extra flavor. When baked inside the peaches, it becomes a delicate yet chewy center that surprises and delights. Before baking, I christen the peaches with white wine or Marsala, which mingles with the rosy color of their skins and creates a gorgeous magenta-tinted syrup in the pan. My dressed up Baked Sunset Peaches with Amaretti Filling are quick and easy to prepare and serve warm or at room temperature with a soft dollop of lightly whipped cream. The sensual, satisfying taste and texture will make them one of your favorite desserts and worth the wait to savor that last, luscious bite of summer.

Baked Sunset Peaches with Amaretti Filling - Yellow peach halves are filled with fragrant ground almonds, sugar and fruit pulp then baked until luscious and gloriously golden with ruby red rims.

Watch as I make my Baked Sunset Peaches with Amaretti Filling step-by-step in this TV appearance below:

BAKED SUNSET PEACHES WITH AMARETTI FILLING
Pesche Ripiene al Forno

Created by Deborah Dal Fovo on August 30, 2016

Baked Sunset Peaches with Amaretti Filling - Yellow peach halves are filled with fragrant ground almonds, sugar and fruit pulp then baked until luscious and gloriously golden with ruby red rims. 
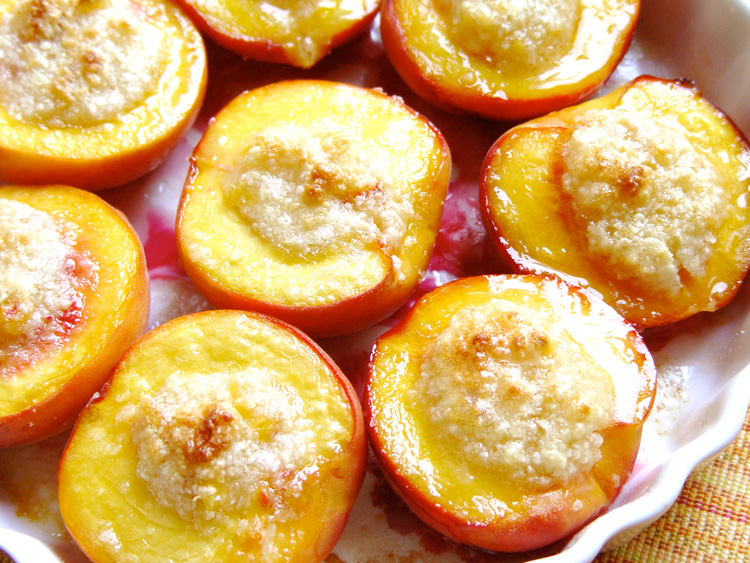
I gave my peaches this name because they look like a beautiful summer sunset in all its glory. Yellow peach halves are filled with ground almonds, sugar and peach pulp then baked until golden with ruby red rims. They’re luscious and worth the wait until late summer when freestone peaches are in season. © 2009 Deborah Dal Fovo. All rights reserved.

  • Prep Time: 10m
  • Cook Time: 30m
  • Serves: 6
  • Category: Recipes

Ingredients

  • 3 ripe yet firm yellow Freestone peaches, without soft spots or blemishes
  • 5 tablespoons/60g sugar
  • 6 tablespoons/38g finely ground blanched, peeled almonds (see note below)
  • 2 tablespoons melted butter/28g, plus more to grease baking dish
  • Dry white wine or Dry Marsala
  • Soft whipped cream to garnish (optional)

Instructions

  1. Preheat the oven to 350°F/180°C. Generously butter a 9-inch baking dish, preferably made of porcelain or glass.
  2. Wash the peaches under cold, running water and pat dry. Divide each peach in half lengthwise by using a sharp knife to cut along the natural crease of the fruit that runs from the stem dimple then continue around its circumference. Separate the peaches halves by gently twisting apart then remove and discard the pits.
  3. Using a melon ball tool or teaspoon, hollow a round 1-inch cavity from the center of each peach half and scoop out the pulp, reserving it for the filling. Arrange the peach halves with cut side up in the baking dish, placing them close together and leaning against one another so they don't tip during baking.
  4. Chop the reserved peach pulp finely and place in a mixing bowl. Add 4 tablespoons of the sugar, ground almonds, 1 tablespoon of the melted butter, and any peach juices that have accumulated on the cutting board, then mix well to combine.
  5. Fill the hollow of each peach with about 1-tablespoon of the almond filling to form a neat mound about the size of a walnut in the center. Lightly christen the peaches with the wine by dipping your fingertips in the liquid and flicking it over the fruit. Evenly sprinkle the surface of each peach with ½-teaspoon sugar, then drizzle with the remaining melted butter.
  6. Place in the center of hot oven and bake for 30 minutes or until the peaches are tender when tested with the point of a paring knife and amaretti filling is lightly golden. Remove from oven and cool for at least 15 minutes before serving warm or at room temperature, plain or garnished with a dollop of lightly sweetened soft whipped cream.
  7. Note: Finely ground almonds are often labeled "almond flour" in the marketplace. You can also make it from scratch by pulsing 1-1/3 ounces/38g blanched, peeled almonds with 1 tablespoon sugar in a food processor until very fine. Use the chopped almonds in recipe without measuring again but reduce the sugar by 1 tablespoon.
Source: Deborah Dal Fovo for La Bella Vita - The Art of Italian Living
  • Print

Filed Under: Desserts - Dolci, Fruit, Recipes

Primary Sidebar

ABOUT ME:

Ciao, I'm Italian chef & cooking expert Deborah Dal Fovo and welcome to my delicious world! In this blog I share my art of creating the beautiful Italian lifestyle known as "la bella vita". Enjoy! Read More…

STAY CONNECTED:

  • Email
  • Facebook
  • Instagram
  • LinkedIn
  • Pinterest
  • YouTube

DOLOMITES CULINARY TOUR:

collage-trentino-500 Join me for my TASTE TRENTINO CULINARY TOUR IN THE DOLOMITES - September 7-13, 2025, a 7-day/6-night gastronomic adventure in the breathtaking Italian Alps. Reserve your spot now!
See More →

PARMA-MODENA-BOLOGNA FOOD TOUR:

parma-modena-bologna food tourJoin me for my PARMA-MODENA-BOLOGNA FOOD TOUR – October 19-25, 2025 – a 7-day/6-night ultimate culinary journey to Italy’s 3 gastronomic capitals. Reserve your spot now!

See More →

Get Inspired! Follow La Bella Vita.

LATEST INSTAGRAM POSTS:

[instagram-feed]

RECENT POSTS:

  • Fiori di Zucca Ripieni
    Baked Stuffed Zucchini Blossoms
  • Crostata di Frutta Estiva
    Summer Fruit and Berry Tart
  • A Taste of Trentino-Alto Adige
    Nonna’s Italian Apple Cake
  • A Slice of the Dolomites
    The Return to my Italian Roots

POPULAR POSTS:

Fiori di Zucca Ripieni
Baked Stuffed Zucchini Blossoms

Crostata di Frutta Estiva
Summer Fruit and Berry Tart

A Taste of Trentino-Alto Adige
Nonna’s Italian Apple Cake

A Slice of the Dolomites
The Return to my Italian Roots

Footer

Menu:

  • Home
  • About Me
  • Recipes
  • Cooking Classes
  • Culinary Tours

LATEST INSTAGRAM POSTS:

[instagram-feed feed=2]

Stay Connected:

  • Email
  • Facebook
  • Instagram
  • LinkedIn
  • Pinterest
  • YouTube

© 2016-2024 Deborah Dal Fovo, La Bella Vita - The Art of Italian Living. All rights reserved.


Loading Comments...