• Skip to main content
  • Skip to primary sidebar
  • Skip to footer

LA BELLA VITA

The Art of Italian Living

  • Home
  • About Me
  • Recipes
  • Cooking Classes
  • Culinary Tours

Vegetables

SAVORY EASTER TART
TORTA SALATA PASQUALE

April 18, 2019 By Deborah Dal Fovo Leave a Comment

savory-easter-tart

Easter is a time of new beginnings. Of transformation and rebirth. So, why not give a traditional dish new life with a modern update? That’s precisely what I was thinking when I did a riff on the classic Italian Easter pie, Torta Pasqualina, to create my Savory Easter Tart. Don’t get me wrong—I love Torta Pasqualina with its layer-upon-layer olive oil pastry crust and whole cooked eggs nestled in thick swaths of ricotta and greens filling. But let’s be honest—the dish can be a bit weighty both on the stomach and the work load—so I decided to revamp it for contemporary tastes and cooks that don’t have time to preapre elaborate dishes into this lighter and more elegant appetizer for Easter lunch.

savory-easter-tart-cut

I set about deconstructing and redesigning the original pie using (more or less) the same ingredients for their magical flavor combination—only elaborated and arranged differently. Since my memory was still vivid of first spying a rarified version of torta pasqualina in an upscale Milan gastronomic shop and marveling at the carefully arranged ribbons of green, white, and pink ingredients framing whole cooked eggs inside—I wanted to achieve a pastel-colored ribbon effect in a low profile, tidy tart. So, instead of mixing all the elements together and breaking whole eggs into divets in the filling, I divide my Savory Easter Tart into stratas and beat the eggs in a creamy custard to pour over separate layers of spinach and ricotta filling, diced ham, and fontina cheese. The result is an open face, multi-layer tart that in Italy is called torta salata—or savory tart similar to French quiche.

savory-easter-tart-slice-side

Then, in lieu of the anywhere from six to thirty-three layers of olive oil pastry layers with top and bottom crusts in the classic version, I line my tart pan with a single sheet of rich butter and egg pastry dough that is super flaky yet sturdy enough to hold a fancy border. Once the pastry shell is filled, I roll the overhanging dough inward to create a fat cord edge then cut it diagonally with scissors to form pointy “beaks”. This border is inspired by the savory tarts of Lucca that are customarily adorned with a golden crown of pastry becchi. During baking, the pastry puffs up (thanks to the butter and eggs) into fine, golden layers, creating a satisfyingly crisp base for the creamy, tender filling.

savory-easter-tart-2

So, there you have it—a behind the scenes look at creating a modern twist on a traditional holiday dish! I hope you like my Savory Easter Tart and will make it for your friends and family. Let me know in the comments below.

This Easter, I’m celebrating new beginnings, transformation and rebirth in cooking and beyond and wish you Happy Easter, Buona Pasqua, and buon appetito!

From my kitchen to your family table,

Deborah

SAVORY EASTER TART
Torta Salata Pasquale

Created by Deborah Dal Fovo on April 15, 2019

This savory tart is my riff on the traditional Torta Pasqualina, an elaborate Italian Easter pie made with multiple layers of pastry dough and filled with whole eggs. My modern version uses the same ingredients and rearranges them in elegant, colorful layers to capture the same magical flavors with less fuss. ©2019 Deborah Dal Fovo.  All rights reserved.

  • Prep Time: 45m
  • Cook Time: 40m
  • Serves: 8
  • Yield: One 9-inch tart
  • Category: Antipasti - Appetizers, Baked Goods, Eggs, First Courses - Primi, Recipes, Tarts, Verdure - Vegetables

Ingredients

For the pastry dough:

  • 1¾ cups/250g unbleached all-purpose flour
  • ½ teaspoon salt
  • 8 tablespoons/113g unsalted butter, cold and cut into ½ inch cubes
  • 2 large eggs

For the tart filling:

  • 1 tablespoon extra virgin olive oil
  • 2 tablespoons/29g butter, plus more to grease tart pan
  • 1 shallot, finely minced
  • 2 tablespoons water
  • 1 pound/455g spinach in bunch (or 8 ounces/227g spinach leaves)
  • ½ cup/125g ricotta cheese, strained of excess moisture if needed
  • 1 tablespoon fresh marjoram leaves, finely chopped
  • 3½ ounces/100g sliced cooked ham, cut into small dice
  • 3½ ounces/100g fontina cheese, cut into small dice
  • 1 cup/250ml heavy cream plus 1 tablespoon for egg wash
  • 3 large eggs
  • ¼ cup/38g freshly grated Parmigiano Reggiano or Grana Padano
  • Kosher or sea salt
  • Freshly ground white or black pepper
  • Freshly ground nutmeg (optional)
  • Special equipment: 9-inch round tart or pie pan

Instructions

  1. Make the pastry dough by placing flour and salt in a large bowl and whisking to sift together. Add the cold butter pieces and toss in the flour to to coat. Rub the butter between your fingers until a crumbly mixture forms. Add the eggs and stir with a fork to combine then work the dough lightly with your hands until it holds together. Turn onto a lightly floured work surface and knead briefly until smooth (without overworking) then shape into a round, flat disk. Wrap the dough in plastic wrap and refrigerate for at least 2 hours and up to 24 hours.
  2. Trim off the stems from the spinach bunch and discard. Rinse the leaves well in several changes of cold water and drain. Place the spinach with water clinging in a large skillet or sauté pan with a tight fitting lid. Sprinkle with salt then cover and cook over medium heat for about 8 minutes or until leaves are tender, stirring occasionally and adding a small amount of water if needed to prevent scorching. The spinach will reduce in mass considerably as it cooks. Lift the cooked spinach out of the pan and transfer to an ice water bath for a couple of minutes then drain well (this will preserve its green color). Gather the spinach into a ball with your hands and squeeze well to eliminate all excess moisture, then place of a cutting board and chop finely.
  3. Heat the olive oil, 1 tablespoon of the butter, minced shallots, pinch of salt, and 2 tablespoons water in a skillet over medium heat. Sauté the shallots until softened and all water has evaporated without browning,, 2 to 3 minutes. Add the chopped spinach, season lightly with salt and pepper and cook for a few minutes, stirring to coat spinach with the cooking oils. Remove from heat, transfer to a mixing bowl and cool completely. When cool, add the ricotta and chopped marjoram and mix well.
  4. Using a rolling pin on a lightly floured work surface, roll the pastry dough into a 15-inch circle. Transfer the sheet of pastry to a buttered tart tin, centering it in the pan, and smoothly line the sides and bottom with dough. Roll the overhanging dough into a border then pinch, cut or mark to create a decorative edge (I roll it toward the center then make diagonal cuts to form beaks). Place tart shell on a baking sheet in the refrigerator until needed.
  5. Preheat the oven to 400°F/200°C.
  6. Heat the cream in a small saucepan until small bubbles form around the edge of the pan but without boiling. In a medium bowl, beat 2 of the eggs well together with grated cheese then slowly add the warm cream, a little at a time, while whisking continuously. Season the egg mixture with ½ teaspoon salt, freshly ground pepper, and nutmeg if desired.
  7. Spread the spinach ricotta mixture evenly over bottom of the tart crust. Sprinkle with a layer of chopped ham then with a layer of chopped fontina cheese. Carefully pour the egg mixture over top. Prepare an egg wash by beating the remaining egg with 1 tablespoon cream then brush the pastry border with the wash.
  8. Place the tart in lower half of the hot oven and bake for about 40 minutes until the custard is set and the pastry is deep golden brown. Remove from oven and cool for 10 minutes before cutting into wedges. Serve warm or at room temperature.
Source: Deborah Dal Fovo
  • Print

Filed Under: Appetizers - Antipasti, Baking, Holiday Dishes, Main Course - Secondo Piatto, Recipes, Uncategorized, Vegetables

BITTERSWEET LOVE {SALAD}
Blood Orange, Arugula & Red Onion Salad

February 14, 2019 By Deborah Dal Fovo Leave a Comment

For lovers around the world, Valentine’s Day is a giddy time to celebrate shared love with hearts and flowers, candy and candle-lit dinners. But what about those of us who are love-less? The ones who lost love, were betrayed in love, or for whom love never even bothered to show up. You know, the kind of love stories that leave a bitter taste in your mouth. What do we celebrate when everyone wears their hearts on their sleeves this Valentine’s Day? We celebrate bittersweet love. That once-possessed, been-there-done-that love story that is no longer and it’s alright. We may be in between lovers or just ok with being happily single, because we can turn lost love’s bittersweet taste into delicious satisfaction. For that reason I created my Bittersweet Love Salad.

bittersweet love salad

They say it’s better to have loved and lost than never to have loved at all. True, though it can be hard to believe when you are in the throes of a breakup, estrangement, or divorce. That’s exactly what happened to me a decade ago. I was fresh out of a marriage-gone-wrong and not feeling very excited about the looming V-Day. But, I was designing a menu and recipes for my Valentine’s cooking class and needed inspiration. After overdosing on all the sticky romantic sweetness of classic dishes, I was about to give up. My heart just wasn’t in it—my heart was broken. I was feeling angry and reluctant to celebrate love—bitter and mad at stupid-cupid for getting me into this mess. Then it hit me—I could create a dish that honored the downside of love. The edgy, other-side-of-amore with lots of flavor and emotion. This could be fun! I set out to choose my ingredients with care—and a pinch of revenge, a dash of malice—but all in the name of good fun and good food.

bittersweet-salad-ingredients

The first thing I chose were some bitter lettuces to pair with sweeter flavors. My first choice was arugula, the beloved spicy green that’s delicate but also asserts its personality in any situation. While thought of as a leafy green, arugula is actually from the brassica family (cabbage, broccoli, cauliflower) and helps detoxify the body. Its peppery flavor has a natural cooling effect that will work to cool off my temper, I thought. I mixed the arugula with some milder speckled and red leaf lettuces and a little frisée—a curly member of the chicory family with a delicious bitter edge. Bitterness can actually be good medicine since studies have shown that bitter-is-better for health and wellbeing. I also added some lovely spears of red endive for more color and bitter sweetness.

blood oranges cutting board

I was seeing red, so it was only natural that I added Blood Oranges to the salad as a no-brainer during February citrus season—and since their vibrant crimson, almost blood-red flesh draws red juice when cut. These juices were running deep—and right into the salad dressing to turn it a beautiful ruby hue. Blood oranges hail from Sicily and are prized citrus fruit with a red-blushed rind and tart sweetness unlike any other fruit. They have an intense aroma and tangy dolcezza with hints of raspberry, which I happily enhanced with raspberry balsamic vinegar in the dressing. The abundant vitamins and minerals in blood oranges may not heal a broken heart, but they will keep it beating and healthy for the next love story! I also gleefully added thin slices of red onion to the salad for an appropriate amount of vengeful bite, and shaved radishes for a riotous, kick-in-the-pants punch that I wish I’d given my ex. All in all, it’s not only a bright, colorful salad perfect for Valentine’s Day, but a flavor-forward, match-made-in-heaven mix of bitter, sweet, and spicy ingredients for an uplifting dish all winter long. 

bittersweet salad closeup

Now, instead of eating your heart out, you can eat my beautiful Bittersweet Love Salad. I guarantee that the lingering taste of love in your mouth will not be bitter. It will be a delicious, bittersweet flavor to savor loves past and loves future—or maybe just the love of bitter greens and fruit ; )  Love yourself today and Happy Valentine’s Day to all!

BITTERSWEET LOVE SALAD
Insalata Dolceamaro

Created by Deborah Dal Fovo on February 12, 2019

bittersweet salad closeup My Valentine’s Day salad celebrates long-lost love and bittersweet memories with a riotous mix of tangy blood oranges, peppery arugula, red onion, and spicy radishes. Never has bitterness tasted so good! © 2019 Deborah Dal Fovo. All rights reserved.

  • Prep Time: 30m
  • Total Time: 30m
  • Serves: 2
  • Category: Antipasti - Appetizers, Appetizers, Contorno - Side Dishes, Fruit, Recipes, Salads - Insalate, Verdure - Vegetables

Ingredients

  • 2 blood oranges
  • 1 red endive
  • 3 ounces/85g arugula leaves (or mixture with other bitter lettuces), washed and dried
  • 1/4 small red onion, peeled
  • 4 radishes, washed and trimmed (I used breakfast and watermelon radishes)
  • 1 tablespoon raspberry white balsamic vinegar or white wine vinegar
  • 3 tablespoons good quality extra virgin olive oil, plus more if needed
  • Kosher or fine sea salt
  • Freshly ground black pepper

Instructions

  1. Supreme each orange in the following manner: using a sharp paring knife, cut about 3/8-inch off the top and bottom of each orange, reserving ends. Set an orange with a flat side down on the cutting board. Starting at the top of the orange, position the blade of the knife in between the orange flesh and ring of white pith inside the rind. Slice downward to the base of the orange, curving the knife around the fruit to cleanly cut off the pith/rind in a single vertical strip. Turn the orange slightly and repeat the motion in strips around the fruit until the rind and all white pith is removed. Repeat procedure on other orange.
  2. Cut out the orange segments by slicing in between the thin membrane walls surrounding each one to release the fruit. Alternatively, you can cut the orange in half down the middle then into thin, half-moon slices.
  3. Arrange the orange segments/slices in a single layer on a plate and season lightly with salt to bring out the natural sweetness of the fruit. Scrape orange juice accumulated on the board into a small bowl. Squeeze the juice from the reserved orange rinds into the bowl and set aside.
  4. Trim ½-inch off the stem end of the endive then separate the leaves and place them in a large mixing bowl. Add the arugula (and other lettuces, if using) to the bowl.
  5. Cut the red onion thinly into fine strips. Slice the radishes into very thin rounds using a sharp knife or mandolin. Add the onions and radishes to the lettuce in the bowl.
  6. Make the salad dressing by seasoning the blood orange juice in the small bowl generously with salt and pepper. Add the vinegar and whisk to dissolve salt. Pour in the olive oil in a thin stream while whisking to create a light emulsion. Taste and adjust seasoning if needed.
  7. Sprinkle the ingredients in the salad bowl lightly with salt and pepper and toss together delicately using your hands. Add the orange segments to the bowl then pour the dressing around the edges of the bowl (not on the lettuce). Toss the ingredients together quickly with your hands to lightly coat with dressing. Lift portions of salad out of the bowl and mound on individual plates, arranging oranges and radishes decoratively. Serve immediately.
Source: Deborah Dal Fovo
  • Print

Filed Under: Fruit, Recipes, Salads - Insalate, Side Dishes - Contorni, Vegetables

Ribollita
Tuscan Bread & Vegetable Soup

January 21, 2019 By Deborah Dal Fovo 4 Comments

ribollita with spoon

Brrrr, it’s cold outside. The perfect time to make a big pot of Ribollita, the iconic Florentine soup that appears on every restaurant menu in Tuscany and beyond each winter. In fact, it’s so popular that the entire Tuscan region has adopted it as its own. Ribollita is the queen of la cucina povera Toscana—Tuscan peasant cooking—and much more than a simple soup. By transforming leftover vegetable soup and 2-day old bread into a culinary masterpiece, ribollita has earned a highly revered place in contemporary Italian cuisine. That says a lot for a dish born out of extreme poverty during ancient times when every scrap of bread and vegetable was thrown into the pot out of sheer desperation for sustenance and nourishment. The result is a dense, flavorful vegetable soup reinforced with white beans and bread—a filling, stick-to-your-ribs dish that’s essentially a thick stew. In fact, the true test of a good ribollita is when a spoon inserted into it stands straight up!

bread slices on cutting board

The name ribollita means “reboiled” and comes from the act of cooking a rich vegetable soup then layering it with hardened day-old bread before recooking it again the next day. This way, the bread absorbs any excess broth and puffs up into soft, fluffy clouds of goodness that turn this dish into a more of a porridge or bread pudding than an actual soup. Historically, ribollita was a versatile, homemade miracle pot created by savvy cooks to be consumed over a 3-day period and keep the family fed for multiple meals. The soup was eaten as-is on the first day then allungata or “stretched” with hardened, day-old bread and reboiled on the second day with any remaining ribollita reheated again on the third day. If necessity is the mother of invention, ribollita takes the grand prize for the most ingenious way to repurpose leftover bread and feed a family on a shoestring.

ribollita vegetables on tray

Ribollita is timely now because its star ingredient, lacinato kale, is readily available during fall and winter months. Also known as Tuscan kale or black cabbage, lacinato is an ancient variety of Italian winter greens from the brassica family whose rugged, heavily crinkled leaves of blue-green to almost black color (hence the Italian name cavolo nero) inspired its common name of Dinosaur or Dino kale. By any name, lacinato kale is a true superfood and powerhouse of vitamins (especially A, C, K), minerals, fiber with excellent health benefits. Its peppery flavor is the perfect foil for creamy cannellini beans that are the other key ingredient (beside bread) in this hearty, nourishing dish. Other winter vegetables like cabbage, red onions, carrots, celery, Swiss chard, and potatoes do their part to create a colorful, tasty base to enhance with kale, beans, and bread. The soup gets its luxurious creaminess from white cannellini beans pureed in their cooking water that create the “broth” in this soup. These dried beans are soaked in water overnight then cooked every-so-slowly so the skins don’t toughen. In a pinch, good quality canned or jarred cannellini can be substituted, but do not compare to freshly cooked beans in their garlic and sage infused cooking water that adds incredible taste and consistency to the soup.

ribollita close up

The bread traditionally used in ribollita is a Tuscan saltless loaf that’s hard to find outside Tuscany. I use homemade natural leaven sourdough bread, but an artisan rustic Italian loaf like Pugliese or ciabatta will do. It’s worthwhile to plan ahead and slice the bread then let it dry out on a baking sheet for a couple of days in advance, but if that’s not an option then drying it in a moderate oven works fine. Once the vegetable soup is made (it can be done a day or two prior), ribollita comes together quickly and easily. The soup is layered with bread slices in a tall casserole, Dutch oven or pot and let rest before popping into the oven to reheat. While you can “reboil” ribollita in a pot on the stove, I like the soft, souffle-like consistency that baking produces. Once hot and bubbly, ribollita is served heaped into soup bowls and drizzled lavishly with fruity extra virgin olive oil.

ribollita in bowl

As my ribollita cooks, the house is filled with a familiar, homey fragrance that takes me back to winters in Tuscany, sitting in front of the blazing stone fireplace waiting for supper to be ready. Aside from being suddenly famished, I feel a flush of abundance in anticipation of eating a big bowl of delicious, nutritious ribollita that deftly defies its poor peasant origins. 

>>Watch me make Ribollita step-by-step on this TV appearance below:


TUSCAN BREAD AND VEGETABLE SOUP
Ribollita

Created by Deborah Dal Fovo on January 21, 2019

ribollita close up 
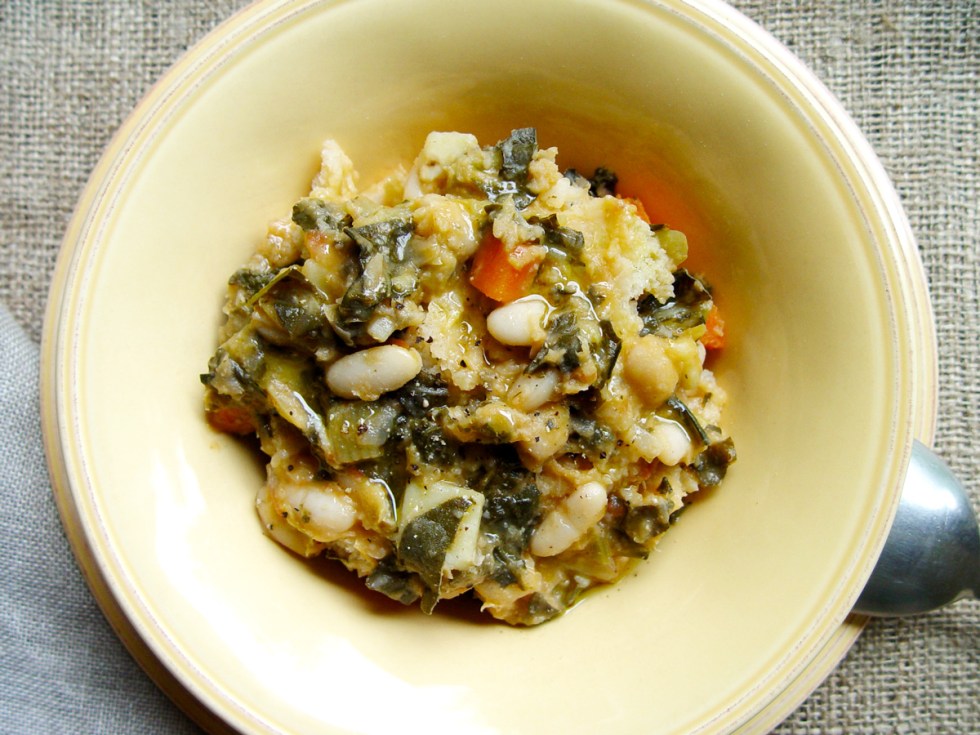
Ribollita is an icon of Tuscan peasant cooking and a culinary masterpiece that transforms day-old bread and repurposed vegetable soup into a hearty, flavorful, and nourishing dish. © 2019 Deborah Dal Fovo. All rights reserved.

  • Prep Time: 30m
  • Cook Time: 3h
  • Total Time: 3h 30m
  • Serves: 8
  • Category: First Courses - Primi Piatti, Recipes, Verdure - Vegetables, Zuppa - Soup

Ingredients

  • 14 ounces/400g dried cannellini beans, about 2 heaping cups (4 cups canned beans can be substituted)
  • 2 garlic cloves, peeled
  • 2 sprigs fresh sage
  • 2 tablespoons extra virgin olive oil
  • ½ cup extra virgin olive oil
  • 2 red onions, peeled and chopped into small dice, about 2 cups (yellow onions may be substituted)
  • 1 leek (white part only), thinly sliced and rinsed
  • 2 carrots, peeled and cut into ½-inch dice
  • 2 celery stalks, trimmed and cut into ½-inch dice
  • 2 cloves garlic, crushed lightly and peeled
  • Few sprigs of fresh thyme
  • 4 ripe plum tomatoes, peeled, seeded and chopped (canned plum tomatoes can be substituted)
  • 1 pound/455g lacinato kale (Tuscan black kale/dinosaur kale), washed, stemmed, and leaves cut into ½-inch strips (about 8 cups)
  • ½ pound/225g Savoy cabbage, washed and shredded into ¼-inch strips (about 4 cups)
  • 1 bunch Swiss chard weighing about ½ pound, washed, stemmed, and leaves only cut into ½-inch strips (about 4 cups)
  • 2 Yukon gold potatoes, peeled and cut into dice
  • One pound/453g Tuscan or rustic bread, cut into ½-inch thick slices and air dried for 2 days until hard (fresh bread slices can be toasted in 350°F/180°C oven)
  • ¼ red onion, finely sliced or chopped to garnish
  • Good quality Tuscan extra virgin olive oil to garnish
  • Kosher or sea salt
  • Freshly ground black pepper

Instructions

  1. Sort through the dried beans and discard any small stones. Place the beans in a large bowl and cover with twice the volume of cold water. Let soak for 12 hours or overnight.
  2. Drain the beans then place them in a heavy pot (preferably made of glazed earthenware) with 2½ quarts/2½ liters cold water, 2 garlic cloves, sage and 2 tablespoons olive oil. Place over medium heat, covered, and bring to a simmer, occasionally skimming off any foam that forms on the surface. Reduce heat to low and cook, with lid slightly askew, at a slow simmer for about 50 minutes or until beans are tender. Add 2 teaspoons salt and cook for another 10 minutes until beans are soft but not mushy. Scoop half the beans out of the pot using a slotted spoon and reserve. Remove the garlic and sage then puree the remaining beans and their cooking liquid through a food mill or using an emersion blender or food processor. If using canned beans, reserve 2 cups whole beans and heat the remaining beans with packing liquid plus 6 cups water until warm. Puree the beans and liquid as directed above then set aside until needed.
  3. Heat 1/2 cup extra virgin olive oil in a large, heavy bottomed pot. Add the onions and leeks, season lightly with salt, and cook until softened, about 5 minutes. Stir in the carrots and celery and cook for a few more minutes. Add the garlic, thyme, and chopped tomatoes and cook for about 5 minutes. Add the lacinato kale in increments, stirring and cooking until leaves wilt down enough to make room for more. Add the cabbage, chard and potatoes to the pot then season the vegetables generously with salt and pepper, stirring to incorporate. Cook the vegetables for 10 minutes until softened and reduced down in volume, then pour in the pureed beans and their liquid plus enough hot water to cover the vegetables. Bring the soup to a boil then reduce the heat to low and cook at a gentle simmer, partially covered, for about one hour until vegetables are soft, stirring occasionally and adding more water if needed. The soup should be fairly thick with a small amount of liquid. Stir the whole beans into the soup during the last 5 minutes of cooking. Remove soup from heat and let cool until just warm then proceed to the next step or refrigerate to continue recipe the next day.
  4. In the bottom of a 3-quart dutch oven or high-sided baking/souffle dish (or two 1.5-quart), spread a 1-inch thick layer of vegetable soup. Arrange one-third of the bread slices to fit over the soup then cover the bread with another layer of soup. Repeat the layers ending with a thick layer of soup (about 3 layers of bread). Let stand for a couple of hours or cover and refrigerate overnight.
  5. The ribollita can now be reheated in one of two ways: in the oven or on the stovetop (I prefer the oven method since it doesn't require attention or stirring). If using the baking method, preheat the oven to 400°F/200°C about one hour before serving time. Drizzle the surface of the ribollita with extra virgin olive oil then sprinkle with sliced red onion and freshly ground black pepper. Bake in center of hot oven for 30 minutes until bubbly and a light crust forms on the surface. Alternately, the soup can be re-boiled (ribollita) over medium-low heat on the stove until heated through.
  6. Serve large ladlefuls of ribollita in soup bowls with generous pours of fruity extra virgin olive oil swirled over top. Leftovers can be refrigerated and reheated up to 3 days later.
Source: Deborah Dal Fovo
  • Print

Filed Under: First Course - Primo Piatto, Recipes, Soups, Vegetables

Valentine’s Day Dinner:
Beet Pasta Ravioli with Ricotta and Radicchio Filling

February 13, 2017 By Deborah Dal Fovo Leave a Comment

Beet Pasta Ravioli with Ricotta and Radicchio Filling

How do I love thee? Let me count the ravioli. Seriously, there’s no better way to say “I love you” than with a plate of handmade pasta lovingly crafted and offered as a token of your affection. After all, you put a little bit of yourself into every bite by kneading, rolling and shaping the pasta even before it is cooked. The act in itself is a delicious labor of love. Then why not take it to the next level with colored pasta and make a real statement? Those were my thoughts last year when I created these Beet Pasta Ravioli with Ricotta and Radicchio Filling for Valentine’s Day. Yes, I make other colored pasta, like these green tagliatelle colored with spinach that I did here. But these Valentine’s ravioli were begging to be red—really, really red—the color of love, of passion, of beets. In fact, for these ravioli the pasta dough is stained deep magenta-red with beets before it lovingly envelopes a creamy ricotta and radicchio filling to form pretty half-moon shaped ravioli. They look stunning on the plate, dressed in a rosy sauce of beet-tinted melted butter and scattered with toasted pine nuts and delicate wisps of shaved Parmigiano. A romantic meal never looked or tasted so good!

Beet Pasta Ravioli with Ricotta and Radicchio Filling

It took a little love on my part to get this beet pasta recipe the way I wanted it. You see, beets stain but they also bleed. That means when red pasta cooks, the color can leach into the boiling water and fade —taking the pasta from bright magenta to drab pink. But that wasn’t good enough for me and I was determined to get an intense red pasta that held up to cooking. And I did…here’s how. I use more beets than most but it works because of a few tricks I’ll share with you. First, I roast the beets so they don’t get watery like they can if you boil them. Then I puree the beets using a fine blade in my food mill, but you can also process in a food processor. Next—and most importantly—I squeeze all the liquid out of the beet puree (saving it for the sauce) in a cotton napkin I don’t mind staining until it’s dry like play dough. This creates a concentrated pigmentation agent to add to the egg before incorporating flour, so less flour is needed and the pasta dough is darker. After kneading the dough until smooth and soft, it is dark magenta and almost purplish in color. But don’t worry because some of the color will fade during boiling and the cooked ravioli will be a lovely shade of red.

Beet Pasta Ravioli with Ricotta and Radicchio Filling

You should know that while red beets color pasta dough beautifully, they can stain your hands and counter tops if you’re not careful. To avoid this, I work on washable cutting boards and wear disposable latex gloves when making the pasta dough. Once the dough is made, roll it thin—either with a rolling pin or using a pasta machine. Cut the pasta sheet into circles, dab each with a spoonful of ricotta and radicchio filling, then fold and seal the edges well to form half moon shaped ravioli. This filling comes together quickly with a mixture of ricotta cheese, egg, Parmigiano and caramelized radicchio. Radicchio is red chicory with a bittersweet peppery flavor that adds spice to the mild ricotta and compliments the beet infused pasta. I like to use Treviso radicchio, but if you can’t find it, the Chioggia variety works well too.

Beet Pasta Ravioli with Ricotta and Radicchio Filling

Once the ravioli are made the work is done leaving plenty of time to get dressed and light the candles on the table. Then, just a few minutes before serving, the pasta cooks while a quick yet sumptuous sauce is made from reserved beet juice and butter to toss the ravioli in and coat them with even more color and flavor. Arranged on plates with a smattering of toasted pine nuts and Parmigiano shavings over top, they make quite an entrance and are sure to set the mood for your romantic meal. Happy Valentine’s Day…or should I say…beet mine?

Beet Pasta Ravioli with Ricotta and Radicchio Filling


BEET PASTA RAVIOLI WITH RICOTTA & RADICCHIO FILLING
Ravioli di Barbabietola con Ricotta e Radicchio

Created by Deborah Dal Fovo on February 8, 2017

Beet Pasta Ravioli with Ricotta and Radicchio Filling The pasta for these half-moon shaped ravioli is tinted deep magenta red by pureed beets then filled with creamy ricotta and caramelized radicchio. They look stunning arranged on a plate dressed in rosy beet-infused melted butter and scattered with toasted pine nuts and Parmigiano shavings.    © 2016 Deborah Dal Fovo. All rights reserved.

  • Prep Time: 2h
  • Cook Time: 10m
  • Yield: 24 ravioli
  • Category: First Courses - Primi Piatti, Pasta, Recipes

Ingredients

Beet Pasta Dough:

  • 6 ounces /160g red beets, trimmed
  • 1 tablespoon extra virgin olive oil
  • 1 cup/120g all-purpose flour, plus more for work surface
  • 1 large egg yolk, lightly beaten
  • Kosher or fine sea salt
  • Freshly ground black pepper

Ravioli Filling:

  • 1 tablespoon extra virgin olive oil
  • 1 tablespoon/14g unsalted butter
  • ½ small shallot, finely minced (2 tablespoons)
  • 2 ½ ounces/70g radicchio (preferably Treviso variety), cut into thin strips and rinsed
  • 4 ounces/113g ricotta cheese
  • 1 large egg yolk
  • 2 tablespoons/6g freshly grated Grana Padano or Parmigiano Reggiano
  • Kosher or sea salt
  • Freshly ground black pepper

Sauce:

  • 1/4 cup reserved beet juice (see instructions)
  • 8 tablespoons/113g unsalted butter, cut into dice
  • 2 tablespoons pine nuts, lightly toasted
  • 2 tablespoons Shaved Grana Padano or Parmigiano Reggiano

Instructions

  1. Preheat oven to 375F/190C degrees.
  2. NOTE: When working with red beets, wear disposable latex gloves and use cutting boards and glass bowls to avoid staining skin and work surfaces.
  3. Wash the beets well under cold water then place in center of a sheet of aluminum foil. Drizzle with olive oil and season with salt and pepper. Wrap the foil over the beets and crimp ends together to form a leak-proof packet then set on a baking sheet. Bake for 45 to 55 minutes until beets are tender when pierced with the point of a knife then remove from oven and cool. Peel the beets, cut into pieces and puree through a food mill or in a food processor until smooth. Place the beet pulp in the center of a clean, cotton napkin (that you don’t mind staining) and squeeze out all excess liquid into a bowl (about ¼ cup) until the pulp is dry like play dough. Set beet juice aside for later use.
  4. To make pasta dough, mound the flour on a cutting board (or in bowl) and form a well in the center. Place the egg yolk, beet pulp and 1/4 teaspoon salt in the well and beat with a fork, gradually dragging in the flour, a little at a time, until a crumbly mass forms. Gather the dough into a ball with your hands and knead on a floured board for 6 to 8 minutes until soft and smooth, adding more flour as needed if sticky. Form dough into a ball then wrap tightly in plastic wrap and set aside to rest.
  5. For the filling, place olive oil, butter, and shallots with 1 tablespoon water in a skillet over medium heat. Sprinkle lightly with salt and cook until shallots are soft and moisture has evaporated, 2 to 3 minutes. Add the radicchio, season with salt and pepper and cook until wilted and lightly caramelized, stirring, about 4 minutes. Remove from heat and cool.
  6. Mix the ricotta, egg yolk and grated cheese together in a bowl until smooth then add the radicchio and stir to combine. Taste and adjust seasoning if needed.
  7. Divide the pasta dough into quarters and work with one piece at a time (keeping the rest wrapped in plastic until needed). Using a pasta machine or rolling pin on floured surface, roll the dough into a thin sheet about 1mm thick (you should see your hand in transparency through the pasta). If using a pasta machine, pass the dough repeatedly through the rollers increasing the setting each time to reduce roller thickness and thin dough.
  8. Lay the pasta sheet on a lightly floured board and cut six 3-inch circles using a floured pasta cutter or wine glass. Place a teaspoon of filling in the center of each circle then fold one side over the filling to form a half-moon shape. Press the dough around the filling with your fingers to expel air pockets and seal edges. If the dough doesn't stick together, brush it very lightly with water before sealing. If desired, use a zig-zagged pasta cutter to make a decorative edge. Arrange the ravioli in a single layer, without touching, on a floured parchment-lined baking sheet and repeat process with remaining dough and filling. (Ravioli can be refrigerated, uncovered, for a few hours.)
  9. Bring a large pot of water to a boil over high heat then add a generous handful of kosher or sea salt. When the water returns to a boil, add the ravioli and stir gently to prevent sticking. Cook the ravioli until ‘al dente’, tender yet firm to bite, 2 to 3 minutes.
  10. While the ravioli cook, boil the reserved beet juice in a large skillet over medium-high heat until thick. Add the butter and melt, stirring to create a smooth sauce. Scoop the ravioli from water using a slotted spoon and place in the sauce. Toss ravioli in the sauce over heat for less than a minute until well coated, adding a little pasta cooking water if needed.
  11. Arrange six ravioli on each plate and drizzle with sauce. Scatter toasted pine nuts over top and sprinkle with cheese shavings. Serve immediately.
Source: Deborah Dal Fovo
  • Print


Filed Under: First Course - Primo Piatto, Pasta, Recipes, Uncategorized, Vegetables

The Sweet Taste of Summer
Peperonata Crostini

August 15, 2016 By Deborah Dal Fovo 2 Comments

Italian Chef Deborah Dal Fovo serves her delicious Peperonata Crostini in the garden.

When life gives you peppers, you make Peperonata. Then you make Peperonata Crostini to accompany a pre-dinner glass of wine to tease the taste buds and get the party started. That’s exactly what I did this summer in Italy. We invited last minute guests to dinner and I needed bite size appetizers to serve with the aperitivi. When my friend walked into the kitchen with an armful of sun-ripened peppers freshly picked from her garden, I just had to turn them into one of my favorite summer dishes.

Peperonata gets its name from the main ingredient in this dish: peppers. And more precisely, bell peppers called peperoni in Italian. But unlike other preparations that grill, roast or sauté these peppers to play up their sharp, often bitter flavor, peperonata takes a different approach to bring out another side of this capsicum—the sweet side. The result is a magical marriage of flavors that is pure culinary alchemy.

Peperonata - a delectable sweet and savory Italian dish featuring colorful ribbons of bell peppers stewed with onions, garlic and tomato. Delicious treat served with roasted meats for on toasted bread crostini for an irresistible appetizer.

In peperonata, lithe ribbons of bright red bell peppers are gently stewed with thinly sliced onions, garlic, and a tinge of tomato until tender, silky and coated with a sweet, syrupy glaze. Fragrant bay leaves lend an aromatic note and a strategic splash of wine vinegar—added as almost an afterthought—gives the stew a surprising tangy finish that lingers on the palate and begs for more. Peperonata’s vibrant mélange of colorful ingredients provides eye candy for an exhilerating taste trifecta of sweet-sour-savory that seduces even the most reluctant pepper eater.

While classic peperonata is made with red bell peppers, I often mix it up by using a combination of red, yellow and orange to create a joyful presentation you can taste first with your eyes. This time, the home-grown peppers from my friend’s garden were a stunning shade of cardinal red and naturally variegated with orange and green streaks from various degrees of sun-kissed ripeness. I paired them with red Tropea onions from Calabria for more sweetness.

Colorful sun-ripened sweet bell peppers and red Tropea onions brighten up the stands at the farmers market.

Peperonata is one of those Italian dishes that every home cook should have in their culinary repertoire. It’s simple to prepare, takes relatively little time and is extremely versatile. Traditionally served warm as an Italian contorno, this vegetable side dish pairs exquisitely with roasted meats like pork, chicken or lamb. It can also be served at room temperature as a relish to accompany Italian salumi and cheeses for an antipasto. And in summer months, I love to serve peperonata as a colorful, tasty topping on toasted bread crostini for an irresistible hors d’oeuvre.

Peperonata - Multi-colored ribbons of sweet bell peppers are stewed with finely sliced onions, tomato and bay leaf in a vibrant sweet and savory dish.

I learned to make peperonata from my friend Carlo in Sirmione, Italy decades ago. Carlo was a man of few words but spared none in teaching me his secrets to making the perfect peperonata. First, he showed me how to gently cook thin slices of onion until translucent before tossing in peppers—meticulously cut into same size ribbons—to infuse more natural sweetness. Next, after adding “just enough” water muddled with some tomato paste “for color”, he tucked two perfumed bay leaves into the pan. “Stew it at a low simmer with the lid slightly askew…but only until the peppers are supple and barely tender when poked with the point of a knife. Don’t overcook or they will become limp and mushy.” Perhaps his best advice, though, was to add vinegar at the very end then boil uncovered to burn off the brash flavor and reduce it to a sweet, shiny glaze that “makes the peppers look like candy”. These little secrets make all the difference in the world and I’ve been preparing peperonata Carlo’s way every since.

Peperonata Crostini – Colorful, sweet and tangy Peperonata makes a vibrant and tasty topping for toasted bread as an irresistible appetizer.

Once the peperonata is made, all I do when guests arrive is toast bread slices in the oven and lovingly drape the peppers on top of each crostino. Here I used a country style Tuscan loaf we had on hand cut into quarter moon shapes. But I often use a dense crumb baguette cut into thin rounds that are easy to pick up and eat while balancing a wine glass in the other hand. Then I sit back, enjoy my own party, and savor the sweet taste of summer in every bite of peperonata crostini.

PEPERONATA CROSTINI
CROSTINI CON PEPERONATA

Created by Deborah Dal Fovo on August 13, 2016

Peperonata Crostini – Colorful, sweet and tangy Peperonata makes a vibrant and tasty topping for toasted bread as an irresistible appetizer. Peperonata is a delectable Italian side dish featuring colorful ribbons of red bell peppers stewed with onion, garlic, and hint of tomato in a sweet and savory melange of flavors. Traditionally served warm to accompany roasted meats, my recipe transforms peperonata into a festive, tasty topping on toasted bread crostini for an irresistible appetizer to offer with aperitivi.     © Copyright 2016 Deborah Dal Fovo. All rights reserved.

  • Prep Time: 20m
  • Cook Time: 40m
  • Total Time: 1h
  • Serves: 10

Ingredients

For the peperonata:

  • 4 large red bell peppers or mixture of red, yellow and orange (2 pounds/900g)
  • 4 tablespoons extra virgin olive oil
  • 2 tablespoons /30g unsalted butter
  • 1 large white onion or 2 sweet Tropea red onions, peeled, quartered and cut into thin half-moon slices
  • 2 large garlic cloves, peeled and sliced paper thin
  • 2 tablespoons sugar
  • 1 tablespoon tomato paste dissolved in 2/3 cup water
  • 2 bay leaves
  • 3 tablespoons white wine vinegar
  • kosher or sea salt
  • freshly ground black pepper

For the crostini:

  • 1 loaf country style Italian bread or dense crumb baguette
  • extra virgin olive oil

Instructions

  1. Wash, core and seed peppers then cut the flesh into 1/4-inch thick ribbons, eliminating any white pith.
  2. Heat the olive oil and butter In a saucepan over medium heat. Once butter melts, add the onions and garlic then sprinkle with a pinch of salt. Cook gently, stirring occasionally, until soft and translucent, reducing heat if needed to prevent browning.
  3. Add the peppers and sprinkle with 1 teaspoon salt, pepper and sugar. Toss peppers in the cooking oils to coat then cook for a minute or two, stirring frequently.
  4. Pour the water and tomato paste mixture into pan then tuck in the bay leaves. Bring to a boil then reduce heat to low and cover pan with a lid slightly askew to allow thin stream of vapor to escape. Cook at a gentle simmer for 25 to 30 minutes until peppers are supple and tender when pierced with point of a paring knife.
  5. Add the vinegar and stir to incorporate. Increase heat to medium and boil uncovered for 3 to 5 minutes, stirring, until harsh vinegar vapors evaporate and sauce thickens to a shiny glaze that coats the peppers.
  6. Remove from heat and discard bay leaves. Taste for seasoning and adjust if needed. Let the peperonata rest for at least 15 minutes before serving. Can be served warm or at room temperature and refrigerated for up to 3 days.
  7. To make the crostini, preheat oven to 350°F/180°C. Cut the bread into 1/4 inch thick slices about 2 inches long. Arrange the bread in a single layer on a baking sheet and brush with olive oil. Place in oven and toast bread until crisp on surface yet soft in center, 5 to 7 minutes.
  8. Drape a few ribbons of peperonata neatly on top of each crostino then drizzle with syrupy cooking juices and a thin stream of olive oil if desired.
Source: Deborah Dal Fovo for La Bella Vita - The Art of Italian Living
  • Print

Filed Under: Appetizers - Antipasti, Recipes, Side Dishes, Vegetables

You say tomato, I say “Pomodori al Riso”
Baked Rice Stuffed Tomatoes

June 24, 2016 By Deborah Dal Fovo 4 Comments

No sooner did I set foot in Italy last summer than the entertaining began. We just arrived in Tuscany and there was already a huge bash happening that night at the villa to celebrate Gianni’s niece’s 18th birthday. A gran gala complete with all the trimmings of an A-list affair had been in the planning stages for months…only for the junior jet-set. My daughter was going with all the cousins and an international guest list of youngsters flown in from London, Paris and beyond. Formal attire was de rigueur for the event — black tie for the boys and long gowns for the girls — and festivities would include champagne (perfectly legal for 18-year olds in Italy), white-glove dinner service, dancing under the stars…the whole shebang. Sounded like fun. But we, the “adults”, were not invited. Only the young and beautiful would attend — a kind of changing of the guard. “That’s ok,” my friend Maria Pia sniffed, “we’ll have our own party for all the parents at our house”. My usual question of “what should I make?” was answered with “qualcosa per un buffet” or something for a buffet dinner. At that exact moment, Maria Pia’s beautiful daughter strutted into the kitchen and announced with aplomb, “I’m wearing a red dress to the party.” Hmmm, I had something rosso on my mind but it was not a dress. There was no question what I would prepare for our dinner party that night and it was also red. Summer was in full swing with record heat waves so tomatoes were ultra-ripe and abundant. And, when you say tomato to me, I immediately think of…Pomodori al Riso.

Baked Rice Stuffed Tomatoes - Pomodori al Riso is a beloved Roman summer dish featuring intensely flavored tomatoes filled with garlic and herb scented rice then baked until wrinkly on a sea of golden potatoes. Simply deliziosi!

Pomodori al Riso is a traditional dish from Rome that pays homage to height-of-summer tomatoes like only Romans can — by placing them center stage as divas of baked vegetables that seduce both the eye and the appetite. Voluptuous tomatoes — kissed first by the sun and then by the oven — are transformed into hollow vessels stuffed with fragrant, garlic-and-herb-infused rice that playfully peeks out from under wrinkly red “caps” perched atop their plump curves like festive hats. In addition to a stunning presentation and easy to serve portions, these intensely flavored stuffed tomatoes are prepared in advance and served at room temperature — making them perfect for summer entertaining.

As with all Italian cooking, making good stuffed tomatoes requires good ingredients: ripe yet FIRM tomatoes, excellent quality rice, fruity extra virgin olive oil, fresh mint, parsley and garlic plus…a little manual dexterity and a lot of patience (I’ll explain later). At the local vegetable stand, I chose tomatoes more-or-less the same size (slightly larger than a tennis ball) by gently squeezing each one to make sure it was firm enough to remain intact during baking. These were pomodori ramati, or cluster tomatoes, that are bright red, round and meaty with a herbaceous, vine-ripened scent. In fact, the ones I selected still had stems attached, some of which I’d leave on for presentation purposes.

Ripe yet firm tomatoes have their tops cut off then are hollowed out to form shells that will hold the rice.

Back in the kitchen, I sliced the rounded tops off the tomatoes to create “lids” then carefully scooped out the pulp, seeds and precious juices from inside each one to form hollow shells with thick walls. This required the use of a serrated grapefruit spoon and a bit of care to avoid piercing the delicate tomato flesh and outer skin (remember the patience I talked about). The hollow tomatoes were turned, cut side down, to drain while the stuffing was made. I pureed the tomato pulp and juices through a food mill to eliminate bitter seeds and tough core then poured in plenty of extra virgin olive oil (I talked about amazing Tuscan olive oil in this previous post). Next, using the resident mezzaluna — a half-moon shaped knife in every Italian kitchen — I made a battuto, or fine chop of garlic-mint-parsley. The rocking motion of the curved blade over this particular combination of herbs released a familiar aromatic scent that reminded me of another classic Roman dish I often make — Carciofi alla Romana — and gives the stuffed tomatoes that unmistakably Roman taste.

An Italian mezzaluna knife rocks back and forth on the cutting board to chop parsely, mint and garlic into a fine paste "battuto".

Rice plays a starring role in this dish and the quality is important. While Arborio works well and is commonly used, Carnaroli or Vialone Nano (also risotto rice) are even better because of their superior quality. I added the raw rice and minced herbs to the tomato juice and gave the mixture a good stir before letting it rest for about half an hour. While the rice soaked up moisture and flavor, I peeled and thickly sliced some potatoes.

Good quality rice is essential for this dish and is macerated in the tomato's own juices and herbs.

With all the prep work done, it was time to put this dish together. I arranged the tomato shells upright in an oiled baking dish and filled them almost full with rice and juices before placing their lids back on. Then I strategically wedged potato slices in between the tomatoes to hold them snugly in place as they baked. The rice would absorb the liquid, plump and cook while the tomatoes baked being held upright by the potatoes that cooked at the same time. At that point I stopped to marvel at the brilliance of the Romans and their clever culinary creativity. But that wasn’t the only thing I was admiring. The sight of the assembled dish was so gorgeous that I grabbed my camera to capture the beauty of nature at work.

Hollowed out tomato shells are filled with rice and topped with their own red lids before being baked.

Deborah Dal Fovo does what it takes to get snap an overhead photo of her beautiful rice stuffed tomatoes before they go into the oven.

As a final gesture of love, I drizzled the tomatoes and potatoes with more olive oil and sprinkled with salt (tomatoes are very needy) before sliding them into the hot oven. The kitchen soon filled with an irresistible aroma, letting me know that the stuffed tomatoes were almost done. When I took them out of the oven after an hour, they were deeply bronzed with wrinkly skin and the potatoes soft with golden edges. I tasted the rice for doneness and it was tender, moist and very tasty. Now came the hard part, but it had nothing to do with work. Tradition dictates that pomodori al riso rest at least one hour before serving to allow flavors to mingle and marry. The temptation was very strong to sneak a tomato, but I resisted. Maria Pia had already set the table and plated the other items for the buffet. There was nothing left to do but wait for guests to arrive and admire our beautiful daughters in their long gowns as they headed off to the gala.

Baked stuffed tomatoes brim with rice infused with the tomato's own juices, garlic and herbs.

Baked Rice Stuffed Tomatoes - A sunny Roman dish perfect for easy summer entertaining.

As we, “the adults”, sat around the large round table under the stars, music from the party at the villa drifted over through the trees and became the background sound to our animated dinner conversation. It was effortless, elegant Italian entertaining at its best. And tonight, Maria Pia’s daughter wasn’t the only lady in red. My baked rice stuffed tomatoes made a spectacular entrance on the table and were enjoyed by all. So, when you say tomato, I will always say “pomodori al riso”.

Italian outdoor dining under the pergola.


BAKED RICE STUFFED TOMATOES
POMODORI AL RISO

Created by Deborah Dal Fovo on June 14, 2016

Baked Rice Stuffed Tomatoes - Pomodori al Riso is a beloved Roman summer dish featuring intensely flavored tomatoes filled with garlic and herb scented rice then baked until wrinkly on a sea of golden potatoes. Simply deliziosi! Pomodori al Riso is a beloved Roman dish that is perfect for summer entertaining and as beautiful as it is delicious. Vivid red vine-ripened tomatoes are hollowed out and filled with rice marinated in the tomato’s own juices, olive oil, garlic and herbs then baked until golden, tender and intensely flavorful.  © 2016 Deborah Dal Fovo. All rights reserved.

  • Prep Time: 45h
  • Cook Time: 60h
  • Serves: 8

Ingredients

  • 8 medium, ripe yet FIRM round red tomatoes each weighing 5 to 6 ounces, preferably with stem leaves attached (cluster tomatoes work well)
  • 1 cup/200g Arborio, Carnaroli or Vialone Nano rice (about 2 tablespoons for each tomato)
  • 8 tablespoons/119ml extra virgin olive oil, plus more for greasing baking dish and drizzling
  • 1 large garlic clove, finely minced (about 1 teaspoon)
  • 1 handful fresh flat leaf Italian parsley leaves, finely chopped (about 1 tablespoon)
  • 10 fresh mint leaves, finely chopped (about 1 teaspoon)
  • 3 large Yukon Gold potatoes
  • Kosher or sea salt
  • Freshly ground black pepper to taste

Instructions

  1. Grease a 9 x 12 oven-proof baking dish with olive oil.
  2. Wash and dry the tomatoes. Using a sharp knife, cut a horizontal slice about 3/8-inch off the stem top of each tomato to form a lid, leaving one side attached like a hinge if desired.
  3. Working on one tomato at a time, use a serrated grapefruit spoon or small paring knife to cut around the inside perimeter of the tomato between the wall of flesh and inner pulp. Carefully scoop out the pulp, core, seeds and juice directly into a food mill set over a non-metallic bowl. Scrape out the tomato to create a hollow shell with thick wall of flesh on sides and bottom (about 3/8-inch), taking care not to pierce the flesh or skin while you work. Repeat the process with each tomato.
  4. Sprinkle a bit of salt inside each tomato then turn them upside down on a cutting board to drain while you prepare the rice stuffing.
  5. Puree the tomato pulp and juices through the food mill into bowl, discarding seeds and cores. If you don’t have a food mill, press the contents through a strainer with the back of a spoon into bowl or pulse contents in a food processor to liquify then strain to eliminate seeds and cores.
  6. Add the raw rice, extra virgin olive oil, and minced garlic and herbs to the tomato juices. Season with 1-tablespoon salt and freshly ground pepper then stir to combine and let stand for 30 to 40 minutes.
  7. Preheat oven to 375°F/190°C.
  8. Pat each tomato shell dry, inside and out, with paper towels. Arrange the tomatoes, cut side up, in the oiled baking dish. Fill the tomato shells about 7/8 full with rice stuffing then spoon remaining tomato juices evenly each. Place the lids back on the tomatoes, matching up if separated.
  9. Peel the potatoes and cut into thick slices. Wedge the potatoes in between and around the tomatoes to hold snugly in place. Drizzle the tomatoes and potatoes liberally with olive oil and sprinkle generously with salt.
  10. Cover the baking dish with a sheet of foil and bake in the center of hot oven for 30 minutes. Remove the foil and bake, uncovered, for another 25 to 30 minutes, basting the tomatoes and rice with cooking juices every now and then.
  11. The stuffed tomatoes are done when they are deeply bronzed with wrinkled lids, the rice is tender and moist, potatoes are soft inside yet crispy around the edges, and the cooking juices have thickened to a glaze-like consistency.
  12. Remove from oven and let rest for at least 1 to 2 hours before serving warm or at room temperature as a appetizer, side dish or lunch entree.
Source: Italian Chef Deborah Dal Fovo. All rights reserved.
  • Print

Filed Under: Appetizers - Antipasti, Recipes, Rice & Grains, Side Dishes, Vegetables

Primary Sidebar

ABOUT ME:

Ciao, I'm Italian chef & cooking expert Deborah Dal Fovo and welcome to my delicious world! In this blog I share my art of creating the beautiful Italian lifestyle known as "la bella vita". Enjoy! Read More…

STAY CONNECTED:

  • Email
  • Facebook
  • Instagram
  • LinkedIn
  • Pinterest
  • YouTube

“TASTE TRENTINO!” CULINARY TOUR:

collage-trentino-500 Join me for TASTE TRENTINO CULINARY TOUR, my 7-day/6-night gastronomic adventure in the breathtaking Italian Alps from September 5-11, 2021. Reserve your spot now!
See More →

Get Inspired! Follow La Bella Vita.

LATEST INSTAGRAMS:

Follow on Instagram

RECENT POSTS:

  • Busiate with Trapanese Pesto
    Busiate al Pesto Trapanese
  • Apricot Almond Cake
    Torta di Mandorle e Albicocche
  • Apricots in Vanilla Syrup
    Albicocche Sciroppate
  • PROOF IN THE PUDDING
    MAGIC LEMON PUDDING {GLUTEN AND DAIRY FREE RECIPE}

POPULAR POSTS:

Busiate with Trapanese Pesto
Busiate al Pesto Trapanese

apricot almond cake with crown of slivered almonds

Apricot Almond Cake
Torta di Mandorle e Albicocche

Apricots in Vanilla Syrup

Apricots in Vanilla Syrup
Albicocche Sciroppate

magic lemon pudding on blue plate

PROOF IN THE PUDDING
MAGIC LEMON PUDDING {GLUTEN AND DAIRY FREE RECIPE}

Footer

Menu:

  • Home
  • About Me
  • Recipes
  • Cooking Classes
  • Culinary Tours

Most recent Instagrams:

Follow on Instagram

Stay Connected:

  • Email
  • Facebook
  • Instagram
  • LinkedIn
  • Pinterest
  • YouTube

© 2016-2023 Deborah Dal Fovo, La Bella Vita - The Art of Italian Living. All rights reserved.


Loading Comments...